
"Next-Gen Recording IPhone/iPad Screens for 2024"
Next-Gen Recording: IPhone/iPad Screens
How to Record iPhone/iPad’s Screen
 DLNow Video Downloader
Shanoon Cox
Mar 27, 2024• Proven solutions
Earlier iOS devices didn’t have the functionality to record their iPhone/iPad’s screen. This could only be done by jailbreaking the device or installing a third-party iPhone/iPad screen recorder.
Another alternative was to connect your device to a Mac and use QuickTime to record your iPhone/iPad screen. This can be also troublesome as you can not carry a Mac along with you if you need to record your iPhone/iPad’s screen.
But all this has changed with the outcome of iOS 11. Apple has added a built-in mobile screen recorder. With the iPhone/iPad built-in screen recorder, you no longer need to jailbreak your device or install third-party screen recorders.
So, in this article, we will show you how to record your iPhone/iPad screen whether your iOS device is running the latest iOS 11 and later versions or not.
- Part 1: How to Record Screen with Built-in Screen Recorder in iPhone/iPad
- Part 2: Use QuickTime to record iPhone/iPad screen
Part 1: How to Record Screen with Built-in Screen Recorder in iPhone/iPad [For iOS 11 and Later Versions]
The iOS 11 has come with a built-in mobile screen recording feature, so if you’re running the iOS 11 and later iOS versions, you can use the free recording tool of iPhone directly. This built-in app has provided a great alternative to the traditional methods to record screen videos without the use of third-party apps for iOS users. The built-in screen recorder has made the whole process very easy and simple. Follow the steps mentioned below if you want to record your iPhone/iPad’s screen.
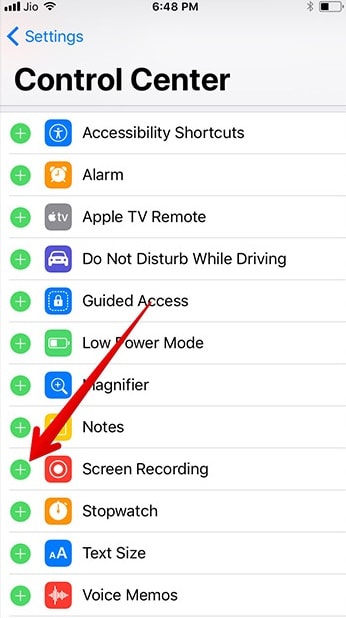
- If you don’t have a screen recorder toggle on the Control Center, you need to enable the Screen Recording feature in the Settings on your iPhone/iPad. First, tap the Settings app, and then tap Control Center > Customize Controls. Find Screen Recording then tap the green “+” button beside it to add the Screen Recording feature to Control Center.
- Open the Control Center by swiping up from the bottom of your iPhone/iPad.

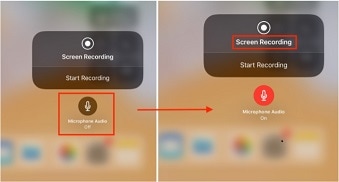
- Tap the screen recording icon that looks like a solid circle enclosed in another circle. And you will see the start recording option and a microphone button. If you want to record the microphone audio, then tap it to turn on the microphone. Then, tap on Start Recording to start.

- The video recording will start after a 3-second delay and the recording button will turn red. A notification will also appear on the top indicating recording time.
- After you are done recording, open the control center again and tap on the screen recorder button again. Alternatively, you can also tap on the red notification on the top of your screen and tap Stop at the prompt.
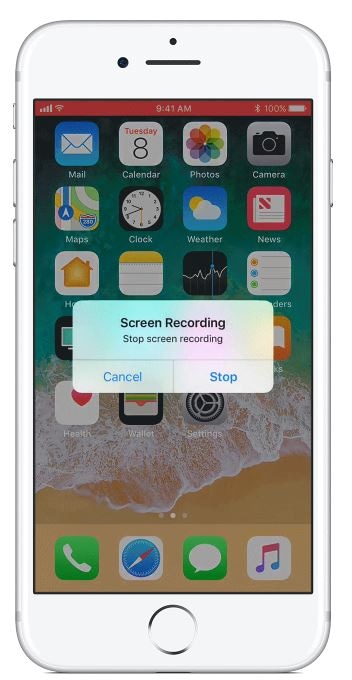
- This will stop the screen recording and the recorded video will be saved in the Photos app.
That’s the steps of how to record your iPhone screen in iOS 11 and later versions. If you want to edit the recorded video with some video editing apps, do not miss the top 10 best video editors for iPhone and iPad .
If your iOS device is running a previous version older than iOS 11, and you do not want to update, then you can record your iPhone screen with some best screen recorders for iOS, or record with QuickTime. In the following section, we will show you how to do it.
Part 2: Use QuickTime to Record Screens of iPhone/iPad (Version Before iOS 11)
People need to download and install a third-party iPhone/iPad screen recorder after jailbreaking the device and going through a complicated installation process. iOS is always risky to jailbreak your device as if you don’t do it carefully your device will get broken. It means your device will stop functioning and you will need to go to Apple care for getting it fixed. Jailbreaking also voids your warranty. So rather than going through these risks, people preferred using QuickTime to record their Phone/iPad’s screen.
With QuickTime media player you could record your iPhone/iPad’s Screen. For recording your iPhone/iPad screen with the help of QuickTime, you would need Mac OS X. Below are the steps to record your iPhone/iPad screen on your Mac by using QuickTime.
1. Connect your iOS device (iPhone/iPad/iPod touch) to your Mac with a USB cable.

2. Launch QuickTime on your Mac available in the application folder.
3. Click on the File menu on the QuickTime menu bar and choose New Movie Recording.
 With Screensaver Wonder you can easily make a screensaver from your own pictures and video files. Create screensavers for your own computer or create standalone, self-installing screensavers for easy sharing with your friends. Together with its sister product Screensaver Factory, Screensaver Wonder is one of the most popular screensaver software products in the world, helping thousands of users decorate their computer screens quickly and easily.
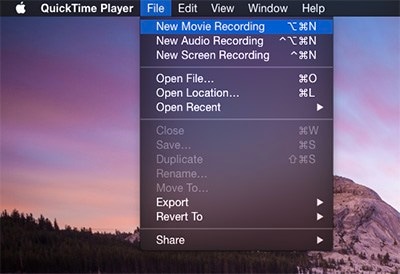
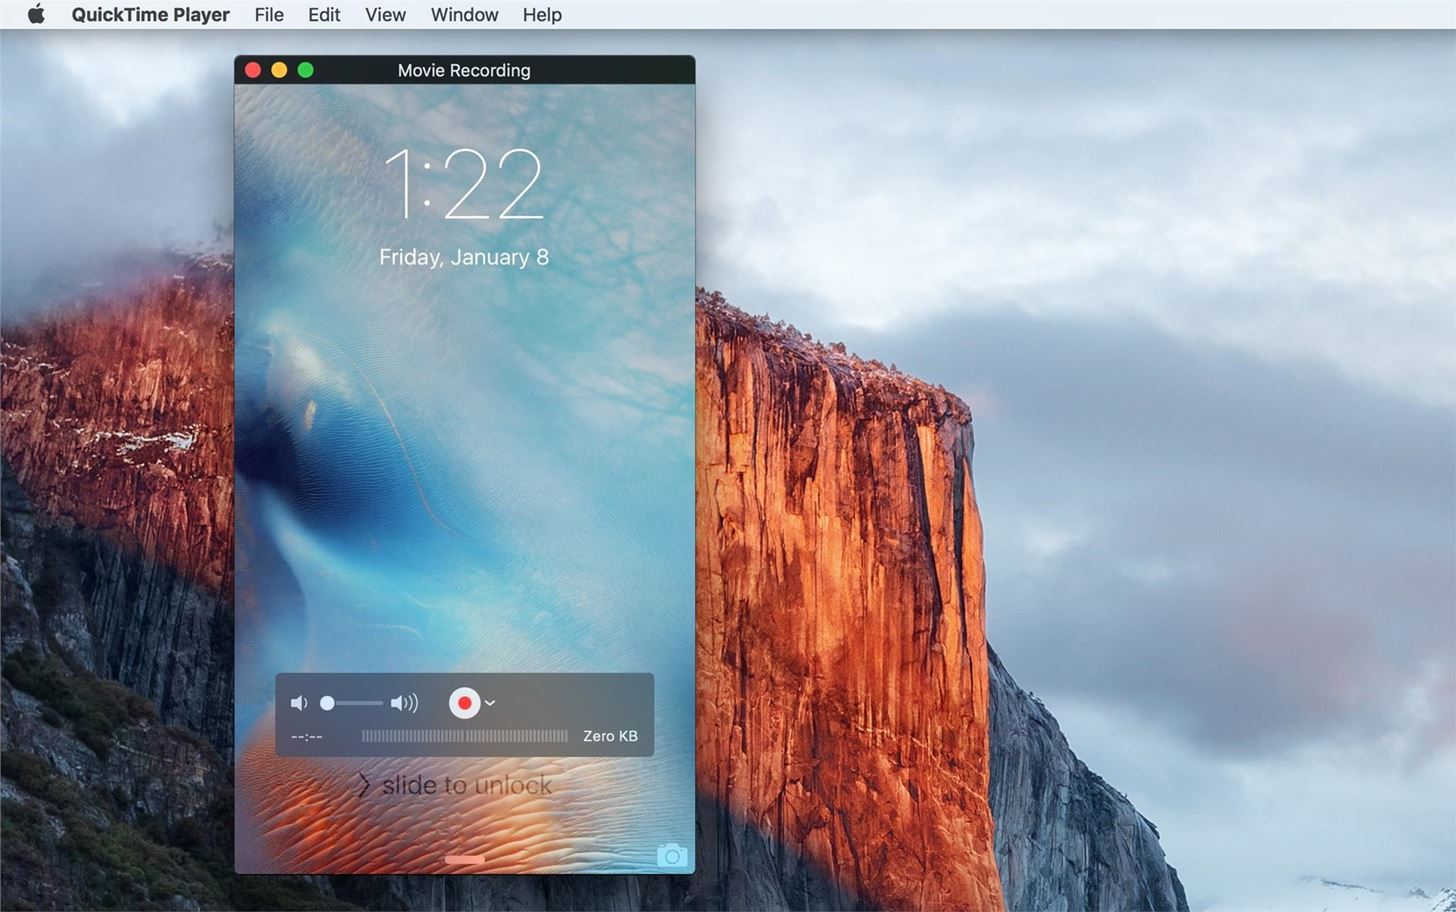
4. A video recording screen will open. Now slide the cursor over that window to make the record and volume button visible.
5. Click on the arrow next to the red record button to show the camera and microphone recording options. Choose your device from the list of devices and you will be able to see your device screen in the QuickTime window.
6. Click on the red record button when you want to start recording.
7. To stop the recording of the screen of your iOS device, click on the Stop button at the video recorder window.
8. If you want to edit the video, you can do it in QuickTime (for basic editing). You can also save the recorded video first and then edit it later. You can directly save it as it is in QuickTime by going to File Menu and clicking on save option.
The recorded video will be saved in .mov file format which you can later export to view on certain devices. You can edit the video later in QuickTime, Wondershare Filmora, or others and share it online for tutorials or demonstration, and whatever you want to do with it. This method of recording the iPhone/iPad screen is useful for devices running the iOS version lower than 11. This is a far safer method to record device screen video than jailbreaking. But with the addition of a mobile screen recorder app in iOS 11 and above, it seems a little bit clumsy by using QuickTime.
Conclusion
iPhone/iPad screen recorder is a very useful tool when you want to record tutorials, demonstrations, or report bugs. The demand for mobile screen recorders is rapidly increasing. Youngsters also love recording funny clips and videos to share the video on social media networks and other platforms. So which method offered above is better, no definite answer. All you need to consider is your own situation. But if you are looking for a screen recorder to record screen on computer , which also provides better video editing features, like blurring the private info , then try Wondershare Filmora.
 The BootIt Collection covers multi-booting, partitioning, and disk imaging on traditional PC’s using the standard BIOS and newer PC’s using UEFI. The collection includes BootIt Bare Metal (BIBM) for standard BIOS systems and BootIt UEFI (BIU) for UEFI system.

Shanoon Cox
Shanoon Cox is a writer and a lover of all things video.
Follow @Shanoon Cox
Shanoon Cox
Mar 27, 2024• Proven solutions
Earlier iOS devices didn’t have the functionality to record their iPhone/iPad’s screen. This could only be done by jailbreaking the device or installing a third-party iPhone/iPad screen recorder.
Another alternative was to connect your device to a Mac and use QuickTime to record your iPhone/iPad screen. This can be also troublesome as you can not carry a Mac along with you if you need to record your iPhone/iPad’s screen.
But all this has changed with the outcome of iOS 11. Apple has added a built-in mobile screen recorder. With the iPhone/iPad built-in screen recorder, you no longer need to jailbreak your device or install third-party screen recorders.
So, in this article, we will show you how to record your iPhone/iPad screen whether your iOS device is running the latest iOS 11 and later versions or not.
- Part 1: How to Record Screen with Built-in Screen Recorder in iPhone/iPad
- Part 2: Use QuickTime to record iPhone/iPad screen
Part 1: How to Record Screen with Built-in Screen Recorder in iPhone/iPad [For iOS 11 and Later Versions]
The iOS 11 has come with a built-in mobile screen recording feature, so if you’re running the iOS 11 and later iOS versions, you can use the free recording tool of iPhone directly. This built-in app has provided a great alternative to the traditional methods to record screen videos without the use of third-party apps for iOS users. The built-in screen recorder has made the whole process very easy and simple. Follow the steps mentioned below if you want to record your iPhone/iPad’s screen.
- If you don’t have a screen recorder toggle on the Control Center, you need to enable the Screen Recording feature in the Settings on your iPhone/iPad. First, tap the Settings app, and then tap Control Center > Customize Controls. Find Screen Recording then tap the green “+” button beside it to add the Screen Recording feature to Control Center.
- Open the Control Center by swiping up from the bottom of your iPhone/iPad.
- Tap the screen recording icon that looks like a solid circle enclosed in another circle. And you will see the start recording option and a microphone button. If you want to record the microphone audio, then tap it to turn on the microphone. Then, tap on Start Recording to start.
- The video recording will start after a 3-second delay and the recording button will turn red. A notification will also appear on the top indicating recording time.
- After you are done recording, open the control center again and tap on the screen recorder button again. Alternatively, you can also tap on the red notification on the top of your screen and tap Stop at the prompt.
- This will stop the screen recording and the recorded video will be saved in the Photos app.
That’s the steps of how to record your iPhone screen in iOS 11 and later versions. If you want to edit the recorded video with some video editing apps, do not miss the top 10 best video editors for iPhone and iPad .
If your iOS device is running a previous version older than iOS 11, and you do not want to update, then you can record your iPhone screen with some best screen recorders for iOS, or record with QuickTime. In the following section, we will show you how to do it.
Part 2: Use QuickTime to Record Screens of iPhone/iPad (Version Before iOS 11)
People need to download and install a third-party iPhone/iPad screen recorder after jailbreaking the device and going through a complicated installation process. iOS is always risky to jailbreak your device as if you don’t do it carefully your device will get broken. It means your device will stop functioning and you will need to go to Apple care for getting it fixed. Jailbreaking also voids your warranty. So rather than going through these risks, people preferred using QuickTime to record their Phone/iPad’s screen.
With QuickTime media player you could record your iPhone/iPad’s Screen. For recording your iPhone/iPad screen with the help of QuickTime, you would need Mac OS X. Below are the steps to record your iPhone/iPad screen on your Mac by using QuickTime.
1. Connect your iOS device (iPhone/iPad/iPod touch) to your Mac with a USB cable.
 PearlMountain Image Converter
2. Launch QuickTime on your Mac available in the application folder.
3. Click on the File menu on the QuickTime menu bar and choose New Movie Recording.
4. A video recording screen will open. Now slide the cursor over that window to make the record and volume button visible.
5. Click on the arrow next to the red record button to show the camera and microphone recording options. Choose your device from the list of devices and you will be able to see your device screen in the QuickTime window.
6. Click on the red record button when you want to start recording.
7. To stop the recording of the screen of your iOS device, click on the Stop button at the video recorder window.
8. If you want to edit the video, you can do it in QuickTime (for basic editing). You can also save the recorded video first and then edit it later. You can directly save it as it is in QuickTime by going to File Menu and clicking on save option.
The recorded video will be saved in .mov file format which you can later export to view on certain devices. You can edit the video later in QuickTime, Wondershare Filmora, or others and share it online for tutorials or demonstration, and whatever you want to do with it. This method of recording the iPhone/iPad screen is useful for devices running the iOS version lower than 11. This is a far safer method to record device screen video than jailbreaking. But with the addition of a mobile screen recorder app in iOS 11 and above, it seems a little bit clumsy by using QuickTime.
Conclusion
iPhone/iPad screen recorder is a very useful tool when you want to record tutorials, demonstrations, or report bugs. The demand for mobile screen recorders is rapidly increasing. Youngsters also love recording funny clips and videos to share the video on social media networks and other platforms. So which method offered above is better, no definite answer. All you need to consider is your own situation. But if you are looking for a screen recorder to record screen on computer , which also provides better video editing features, like blurring the private info , then try Wondershare Filmora.

Shanoon Cox
Shanoon Cox is a writer and a lover of all things video.
Follow @Shanoon Cox
Shanoon Cox
Mar 27, 2024• Proven solutions
Earlier iOS devices didn’t have the functionality to record their iPhone/iPad’s screen. This could only be done by jailbreaking the device or installing a third-party iPhone/iPad screen recorder.
Another alternative was to connect your device to a Mac and use QuickTime to record your iPhone/iPad screen. This can be also troublesome as you can not carry a Mac along with you if you need to record your iPhone/iPad’s screen.
But all this has changed with the outcome of iOS 11. Apple has added a built-in mobile screen recorder. With the iPhone/iPad built-in screen recorder, you no longer need to jailbreak your device or install third-party screen recorders.
So, in this article, we will show you how to record your iPhone/iPad screen whether your iOS device is running the latest iOS 11 and later versions or not.
- Part 1: How to Record Screen with Built-in Screen Recorder in iPhone/iPad
- Part 2: Use QuickTime to record iPhone/iPad screen
Part 1: How to Record Screen with Built-in Screen Recorder in iPhone/iPad [For iOS 11 and Later Versions]
The iOS 11 has come with a built-in mobile screen recording feature, so if you’re running the iOS 11 and later iOS versions, you can use the free recording tool of iPhone directly. This built-in app has provided a great alternative to the traditional methods to record screen videos without the use of third-party apps for iOS users. The built-in screen recorder has made the whole process very easy and simple. Follow the steps mentioned below if you want to record your iPhone/iPad’s screen.
- If you don’t have a screen recorder toggle on the Control Center, you need to enable the Screen Recording feature in the Settings on your iPhone/iPad. First, tap the Settings app, and then tap Control Center > Customize Controls. Find Screen Recording then tap the green “+” button beside it to add the Screen Recording feature to Control Center.
- Open the Control Center by swiping up from the bottom of your iPhone/iPad.
- Tap the screen recording icon that looks like a solid circle enclosed in another circle. And you will see the start recording option and a microphone button. If you want to record the microphone audio, then tap it to turn on the microphone. Then, tap on Start Recording to start.
- The video recording will start after a 3-second delay and the recording button will turn red. A notification will also appear on the top indicating recording time.
- After you are done recording, open the control center again and tap on the screen recorder button again. Alternatively, you can also tap on the red notification on the top of your screen and tap Stop at the prompt.
- This will stop the screen recording and the recorded video will be saved in the Photos app.
That’s the steps of how to record your iPhone screen in iOS 11 and later versions. If you want to edit the recorded video with some video editing apps, do not miss the top 10 best video editors for iPhone and iPad .
If your iOS device is running a previous version older than iOS 11, and you do not want to update, then you can record your iPhone screen with some best screen recorders for iOS, or record with QuickTime. In the following section, we will show you how to do it.
Part 2: Use QuickTime to Record Screens of iPhone/iPad (Version Before iOS 11)
People need to download and install a third-party iPhone/iPad screen recorder after jailbreaking the device and going through a complicated installation process. iOS is always risky to jailbreak your device as if you don’t do it carefully your device will get broken. It means your device will stop functioning and you will need to go to Apple care for getting it fixed. Jailbreaking also voids your warranty. So rather than going through these risks, people preferred using QuickTime to record their Phone/iPad’s screen.
With QuickTime media player you could record your iPhone/iPad’s Screen. For recording your iPhone/iPad screen with the help of QuickTime, you would need Mac OS X. Below are the steps to record your iPhone/iPad screen on your Mac by using QuickTime.
1. Connect your iOS device (iPhone/iPad/iPod touch) to your Mac with a USB cable.
2. Launch QuickTime on your Mac available in the application folder.
3. Click on the File menu on the QuickTime menu bar and choose New Movie Recording.
4. A video recording screen will open. Now slide the cursor over that window to make the record and volume button visible.
5. Click on the arrow next to the red record button to show the camera and microphone recording options. Choose your device from the list of devices and you will be able to see your device screen in the QuickTime window.
6. Click on the red record button when you want to start recording.

7. To stop the recording of the screen of your iOS device, click on the Stop button at the video recorder window.
8. If you want to edit the video, you can do it in QuickTime (for basic editing). You can also save the recorded video first and then edit it later. You can directly save it as it is in QuickTime by going to File Menu and clicking on save option.
The recorded video will be saved in .mov file format which you can later export to view on certain devices. You can edit the video later in QuickTime, Wondershare Filmora, or others and share it online for tutorials or demonstration, and whatever you want to do with it. This method of recording the iPhone/iPad screen is useful for devices running the iOS version lower than 11. This is a far safer method to record device screen video than jailbreaking. But with the addition of a mobile screen recorder app in iOS 11 and above, it seems a little bit clumsy by using QuickTime.
Conclusion
iPhone/iPad screen recorder is a very useful tool when you want to record tutorials, demonstrations, or report bugs. The demand for mobile screen recorders is rapidly increasing. Youngsters also love recording funny clips and videos to share the video on social media networks and other platforms. So which method offered above is better, no definite answer. All you need to consider is your own situation. But if you are looking for a screen recorder to record screen on computer , which also provides better video editing features, like blurring the private info , then try Wondershare Filmora.

Shanoon Cox
Shanoon Cox is a writer and a lover of all things video.
Follow @Shanoon Cox
Shanoon Cox
Mar 27, 2024• Proven solutions
Earlier iOS devices didn’t have the functionality to record their iPhone/iPad’s screen. This could only be done by jailbreaking the device or installing a third-party iPhone/iPad screen recorder.
Another alternative was to connect your device to a Mac and use QuickTime to record your iPhone/iPad screen. This can be also troublesome as you can not carry a Mac along with you if you need to record your iPhone/iPad’s screen.
But all this has changed with the outcome of iOS 11. Apple has added a built-in mobile screen recorder. With the iPhone/iPad built-in screen recorder, you no longer need to jailbreak your device or install third-party screen recorders.
So, in this article, we will show you how to record your iPhone/iPad screen whether your iOS device is running the latest iOS 11 and later versions or not.
- Part 1: How to Record Screen with Built-in Screen Recorder in iPhone/iPad
- Part 2: Use QuickTime to record iPhone/iPad screen
Part 1: How to Record Screen with Built-in Screen Recorder in iPhone/iPad [For iOS 11 and Later Versions]
The iOS 11 has come with a built-in mobile screen recording feature, so if you’re running the iOS 11 and later iOS versions, you can use the free recording tool of iPhone directly. This built-in app has provided a great alternative to the traditional methods to record screen videos without the use of third-party apps for iOS users. The built-in screen recorder has made the whole process very easy and simple. Follow the steps mentioned below if you want to record your iPhone/iPad’s screen.
- If you don’t have a screen recorder toggle on the Control Center, you need to enable the Screen Recording feature in the Settings on your iPhone/iPad. First, tap the Settings app, and then tap Control Center > Customize Controls. Find Screen Recording then tap the green “+” button beside it to add the Screen Recording feature to Control Center.
- Open the Control Center by swiping up from the bottom of your iPhone/iPad.
- Tap the screen recording icon that looks like a solid circle enclosed in another circle. And you will see the start recording option and a microphone button. If you want to record the microphone audio, then tap it to turn on the microphone. Then, tap on Start Recording to start.
- The video recording will start after a 3-second delay and the recording button will turn red. A notification will also appear on the top indicating recording time.
- After you are done recording, open the control center again and tap on the screen recorder button again. Alternatively, you can also tap on the red notification on the top of your screen and tap Stop at the prompt.
 Power Tools add-on for Google Sheets, Lifetime subscription
- This will stop the screen recording and the recorded video will be saved in the Photos app.
That’s the steps of how to record your iPhone screen in iOS 11 and later versions. If you want to edit the recorded video with some video editing apps, do not miss the top 10 best video editors for iPhone and iPad .
If your iOS device is running a previous version older than iOS 11, and you do not want to update, then you can record your iPhone screen with some best screen recorders for iOS, or record with QuickTime. In the following section, we will show you how to do it.
 EmEditor Professional (Lifetime License, non-store app)
Part 2: Use QuickTime to Record Screens of iPhone/iPad (Version Before iOS 11)
People need to download and install a third-party iPhone/iPad screen recorder after jailbreaking the device and going through a complicated installation process. iOS is always risky to jailbreak your device as if you don’t do it carefully your device will get broken. It means your device will stop functioning and you will need to go to Apple care for getting it fixed. Jailbreaking also voids your warranty. So rather than going through these risks, people preferred using QuickTime to record their Phone/iPad’s screen.
With QuickTime media player you could record your iPhone/iPad’s Screen. For recording your iPhone/iPad screen with the help of QuickTime, you would need Mac OS X. Below are the steps to record your iPhone/iPad screen on your Mac by using QuickTime.
1. Connect your iOS device (iPhone/iPad/iPod touch) to your Mac with a USB cable.
2. Launch QuickTime on your Mac available in the application folder.
3. Click on the File menu on the QuickTime menu bar and choose New Movie Recording.
4. A video recording screen will open. Now slide the cursor over that window to make the record and volume button visible.
5. Click on the arrow next to the red record button to show the camera and microphone recording options. Choose your device from the list of devices and you will be able to see your device screen in the QuickTime window.
6. Click on the red record button when you want to start recording.
7. To stop the recording of the screen of your iOS device, click on the Stop button at the video recorder window.
8. If you want to edit the video, you can do it in QuickTime (for basic editing). You can also save the recorded video first and then edit it later. You can directly save it as it is in QuickTime by going to File Menu and clicking on save option.
The recorded video will be saved in .mov file format which you can later export to view on certain devices. You can edit the video later in QuickTime, Wondershare Filmora, or others and share it online for tutorials or demonstration, and whatever you want to do with it. This method of recording the iPhone/iPad screen is useful for devices running the iOS version lower than 11. This is a far safer method to record device screen video than jailbreaking. But with the addition of a mobile screen recorder app in iOS 11 and above, it seems a little bit clumsy by using QuickTime.
Conclusion
iPhone/iPad screen recorder is a very useful tool when you want to record tutorials, demonstrations, or report bugs. The demand for mobile screen recorders is rapidly increasing. Youngsters also love recording funny clips and videos to share the video on social media networks and other platforms. So which method offered above is better, no definite answer. All you need to consider is your own situation. But if you are looking for a screen recorder to record screen on computer , which also provides better video editing features, like blurring the private info , then try Wondershare Filmora.

Shanoon Cox
Shanoon Cox is a writer and a lover of all things video.
Follow @Shanoon Cox
- Title: Next-Gen Recording IPhone/iPad Screens for 2024
- Author: Emma
- Created at : 2024-07-24 09:14:07
- Updated at : 2024-07-25 09:14:07
- Link: https://on-screen-recording.techidaily.com/next-gen-recording-iphoneipad-screens-for-2024/
- License: This work is licensed under CC BY-NC-SA 4.0.