![[Updated] 2024 Approved Optimizing Latency for Real-Time OBS Viewing](https://thmb.techidaily.com/52f8da45eabd9e84edabed13a325d84ff2b39dca8fb87ff4960ee8bff73c07e4.jpg)
"[Updated] 2024 Approved Optimizing Latency for Real-Time OBS Viewing"
Optimizing Latency for Real-Time OBS Viewing
When you are live streaming through OBS Studio, encoding the video takes a lot of CPU resources. If you do not have a high-end computer, you are likely to face Encoding Overloaded issue while using OBS Studio. High encoding problem is rather common in OBS Studio because video recording and streaming demand high system resources which your computer is unable to meet.
In layman’s terms, encoding overloading means your hardware is just not running as fast as required to process the video you are streaming or recording. Since you cannot change your hardware configuration overnight, here are the different ways you can fix OBS high encoding when streaming.
Way 1. Downscale Your Output Resolution
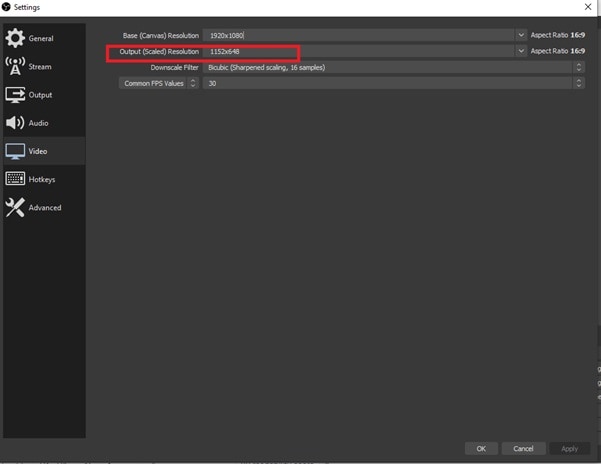
The higher the resolution of the video recording or streaming, the greater will be the CPU usage. This is because your processor has to process more number of pixels per frame. That is why you have to lower the output resolution of your video. Even when your base resolution is high, you have to cut down the output resolution. Base resolution is the resolution of the video at source which could be the game you are playing. The output resolution is the resolution of the video you are getting after recording or you are streaming in real-time. Here are the steps to follow.
Step 1: Open OBS and go to Settings.
Step 2: Select Video tab. You will have to look for Output (Scaled) Resolution option.
Step 3: You have to reduce the resolution from the current resolution. If it is at 1920 x 1080p, you have to bring it down to 1280 x 720p.
Step 4: Click on Apply and Ok buttons. Restart your computer and start streaming or recording again.
Way 2. Lower Your Frame Rate
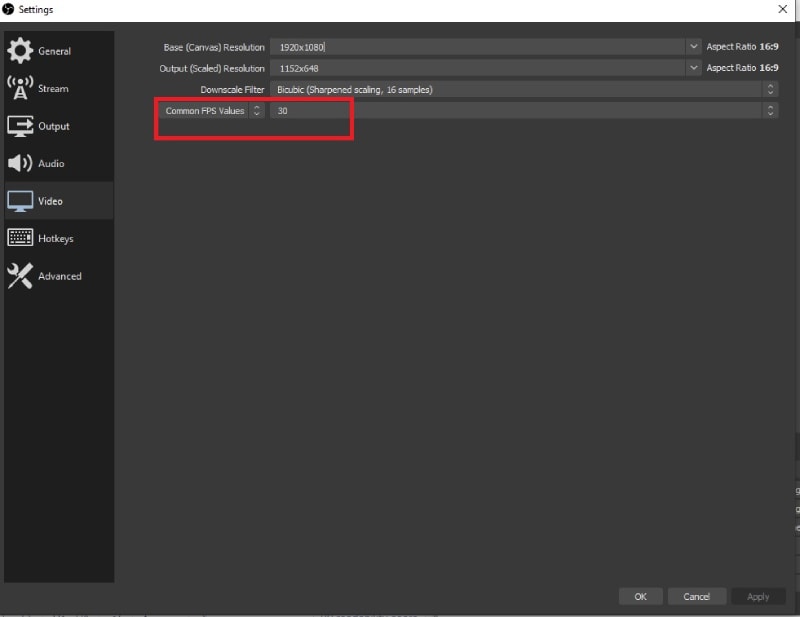
The frame rate of a video determines the number of frames captured per second. The higher the frame rate, the greater will be the pressure on GPU to render more number of frames per second. Unless you have a powerful configuration, you will come across OBS high encoding when streaming if the frame rate is high such as 60FPS. Here are the steps to lower the frame rate of your video on OBS.
Step 1: Launch OBS and go to Settings.
Step 2: Go to Video tab and look for Common FPS Values option.
Step 3: If it is set to 60, you have to bring it down to 30. Basically, you have to reduce the current value.
Step 4: Click on Apply and Ok button to save the new setting. Restart your computer and resume your OBS operation.
Way 3. Change Encoder Preset
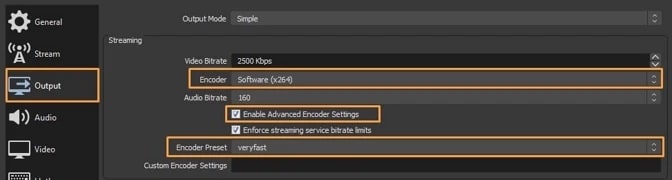
By default, OBS uses x264 as encoder and the encoder preset is set to “veryfast”. This is generally the best and most balanced setting. However, if you are getting OBS high encoding warning, you have to change the encoder preset to reduce the CPU usage. Generally, the higher the preset, the lower is CPU usage. Therefore, you have to set the preset from “veryfast” to “ultrafast” and here are the steps.
Step 1: Launch OBS and go to Settings.
Step 2: Go to Output tab and make sure that the encoder is Software(x264).
Step 3: Turn on Enable Advanced Encoder Settings option.
Step 4: Change the Encoder Preset from Veryfast to Ultrafast.
Step 5: Click on Apply and Ok button. Restart your computer and perform your action on OBS.
Way 4. Try Hardware Encoding
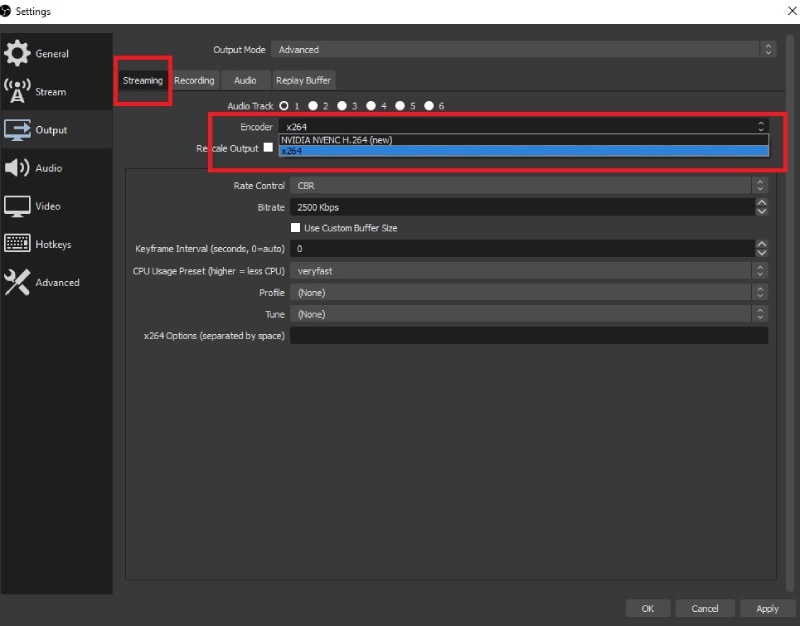
You can try out different hardware encoders available such as Quicksync, AMF, or NVENC. The availability of different hardware encoders depends on your computer hardware configuration. These hardware encoders are better than the default x264 encoder as they use less CPU resources. Since the issue is primarily with encoder, you should try changing the encoder and see if the problem is fixed.
Step 1: On OBS, you will have to go to Settings.
Step 2: Select Output tab and set Output Mode to Advanced.
Step 3: Go to Streaming tab, and check all the encoders available.
Step 4: Change the encoder from default x264 to any other hardware encoder available.
Step 5: Click on Apply and Ok to save the settings. Restart your computer and perform your operation on OBS.
Way 5. Change Some Advanced Settings
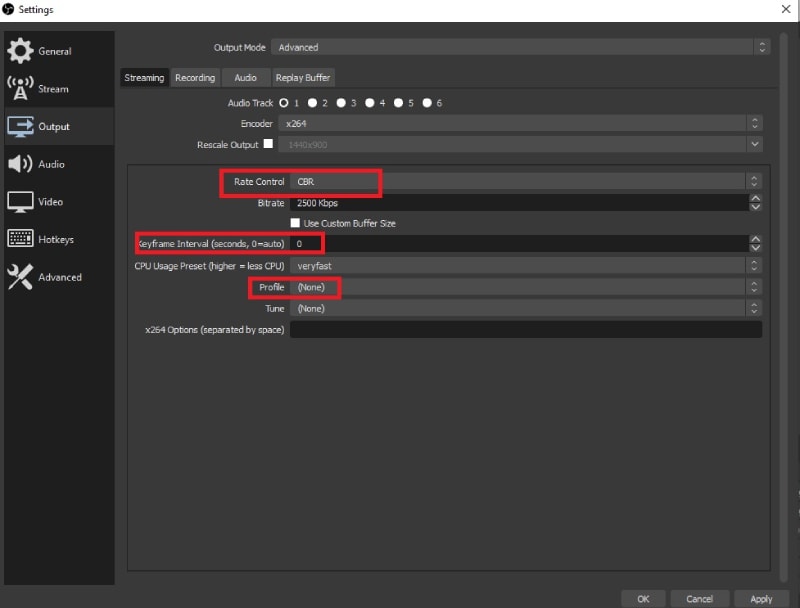
If you are still facing OBS high encoding problem, you need to change some advanced settings in order to fix this encoder overloaded issue. You can change the keyframe interval so that your processor gets enough time for rendering. Similarly, you can change Rate Control from Constant to Variable so that the video does not demand high bandwidth.
Step 1: Open OBS and go to Settings.
Step 2: Go to Output tab and set Output Mode as Advanced.
Step 3: From Streaming tab, change Keyframe Interval and set it to 2 from zero.
Step 4: Change Rate Control from CBR to VBR.
Step 5: Change Profile from None to Main.
Step 6: Click on Apply and Ok button to save the changes. Restart your computer and check if the problem is resolved.
Way 6. Use OBS Alternative
If none of the above-mentioned ways can solve the constant encoding overloaded warning you are receiving while using OBS Studio for recording or streaming, you have to opt for an alternative. Wondershare Filmora is the best alternative to OBS for recording screen and webcam. Filmora does not affect the CPU performance as significantly as OBS Studio does. That is why the encoding overloaded issue is unlikely to occur in Filmora.
Filmora is one of the most popular video recorders that come with inbuilt video editor. You can record your screen, gameplay as well as webcam along with audio from different sources. Thereafter, you can edit the video as per your requirements starting from adding effects and animations to adjusting color and trimming out unnecessary parts. Here are the steps to record screen with Filmora.
For Win 7 or later (64-bit)
For macOS 10.12 or later
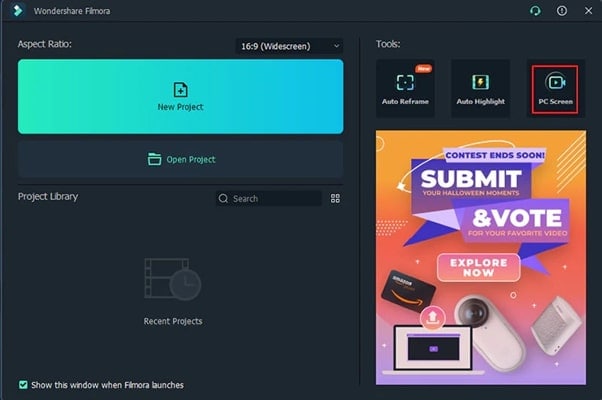
Step 1: Install Wondershare Filmora on your computer based on your OS. Launch Filmora and click on PC Screen to record your screen.
Step 2: Select the recording screen size and the audio sources. If you want to capture webcam as well, turn on Record The Camera Stream option.

Step 3: Click on Record button to start recording. Press F9 to stop recording whenever you want.
Step 4: You can edit the recorded video. Thereafter, click on Export button to save it on your hard drive in any desired file format.

Conclusion
OBS high encoding warning or encoding overloaded warning is not uncommon. In fact, you are likely to come across this problem if you do not have a high-end computer. In that case, you have to lower resolution, lower frame rate, change encoder preset, try different encoders as well as tweak advanced settings to fix the problem. If the problem is not solved after trying out all the means available, you can switch to Wondershare Filmora as a better alternative for recording and video editing.
For macOS 10.12 or later
Step 1: Install Wondershare Filmora on your computer based on your OS. Launch Filmora and click on PC Screen to record your screen.
Step 2: Select the recording screen size and the audio sources. If you want to capture webcam as well, turn on Record The Camera Stream option.
Step 3: Click on Record button to start recording. Press F9 to stop recording whenever you want.
Step 4: You can edit the recorded video. Thereafter, click on Export button to save it on your hard drive in any desired file format.
Conclusion
OBS high encoding warning or encoding overloaded warning is not uncommon. In fact, you are likely to come across this problem if you do not have a high-end computer. In that case, you have to lower resolution, lower frame rate, change encoder preset, try different encoders as well as tweak advanced settings to fix the problem. If the problem is not solved after trying out all the means available, you can switch to Wondershare Filmora as a better alternative for recording and video editing.
Also read:
- [New] Simplifying Android Screen Recordings A User-Friendly Method for 2024
- [Updated] 2024 Approved How to Trim YouTube Videos Like a Pro
- [Updated] 2024 Approved Instagram Live via OBS Technology
- [Updated] 2024 Approved Simplify Your Audio Life - Master VRecorder Installs
- [Updated] Archive Gamer's Best Runs Using Samsung Phones
- [Updated] Eco-Friendly Recorder - Ads Absolved for 2024
- [Updated] In 2024, Steps to Record Your Gameplay on a Nintendo Switch
- [Updated] Mastering SRT Output From Adobe Premiere
- [Updated] Slo Mo Video App - Complete Review 2024
- [Updated] Stepwise Approach for Professional Screen Recordings in Adobe Captive for 2024
- 5 Easy Ways to Change Location on YouTube TV On Honor 90 Pro | Dr.fone
- ChatBot Showdown: Which AI Runs the House?
- Choosing Your Next Phone? See How iPhone 15 Pro Max Stands Up to the Samsung S24 Ultra
- Discover the Ultimate List of Leading Game Introduction Tools – Top 17 Reviewed!
- Resident Evil Village: Overcoming PC Display Problems and Restoring Your Gaming Experience
- Techniques for Saving Teams Meetings (Desktop/Mobile)
- Troubleshooting Guide How to Fix an Unresponsive Infinix Zero 5G 2023 Turbo Screen | Dr.fone
- Title: [Updated] 2024 Approved Optimizing Latency for Real-Time OBS Viewing
- Author: Emma
- Created at : 2025-01-02 19:48:28
- Updated at : 2025-01-07 21:36:56
- Link: https://on-screen-recording.techidaily.com/updated-2024-approved-optimizing-latency-for-real-time-obs-viewing/
- License: This work is licensed under CC BY-NC-SA 4.0.