![[Updated] 2024 Approved The Essential Guide to Streaming Quality via OBS, YouTube & Twitch](https://thmb.techidaily.com/f75585e4daf78953dd0ce1cfd0b26209fab1e9c588003fe7de564148a8e3e23c.jpg)
"[Updated] 2024 Approved The Essential Guide to Streaming Quality via OBS, YouTube & Twitch"
The Essential Guide to Streaming Quality via OBS, YouTube & Twitch
Part 1: Introduction
If you want to enhance your audience reach, consider multi-streaming to Twitch and your other preferred sites. Mainstreaming enables you to broadcast on Twitch and YouTube or stream on Twitch and Facebook, or all three! At the same time, with everyone spending more time indoors amid the global crisis, it appears we’re all seeking a diversion and many gamers are asking themselves how to broadcast on YouTube or Twitch. One of the easiest methods to broadcast on Twitch and YouTube Gaming at the same time is via OBS. Streamers may broadcast to more than 30 streaming platforms concurrently using an easy-to-understand user interface. The service is created in a manner that won’t place any demand on your PC hardware or the bandwidth you have available.
Well, it all boils down to choosing. But if you want to know the streaming networks with the highest traffic, those platforms are Twitch and YouTube Gaming. Twitch is a mainstreaming service that enables you to broadcast on more than 30 of your favorite platforms simultaneously. It merely takes a few minutes to join your numerous live streaming accounts and interact directly with the popular encoding program OBS. You may also multi streams on Twitch and your other favorite streaming services. Knowing what the correct gear is when you’re starting as a streamer may be intimidating, but we come with good news. Nowadays the entry-level for streaming has reduced quite a bit owing to hardware becoming more affordable, but also because many PCs are already prepared to manage a broadcast or can be readily updated to support one.
Part 2: Stream to Twitch with OBS
If you want to obtain the very greatest quality broadcast, you’re searching for some fantastic software. In the case of Windows, one of the most common solutions is Open Broadcaster Software (OBS) (OBS). Many people are first drawn to OBS since it’s free to use owing to being open source. Luckily, it’s also a feature-rich piece of software that can handle practically anything you throw at it. If you’re new to OBS or to streaming in general, it might be a bit frightening at first.
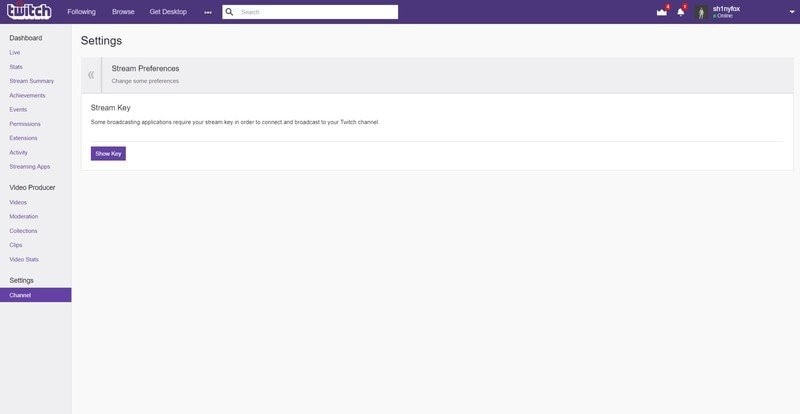
Step 1. Getting a Stream Key from Twitch
Before you stream anything anyplace, you need to provide OBS with the credentials to broadcast on your channel. Exactly how you do this on the large number of services OBS supports may differ, but I’m covering Twitch for this instruction.
In all circumstances, you need to either produce a stream key in your account settings on the appropriate provider or link your account to OBS if it’s supported like it is on Twitch. Simply signing in with your credentials is by far the simplest approach, and OBS utilizes streaming, so you’re not providing any of your personal login information directly to it. YouTube likewise offers a similar kind of authentication.
Step 2. Installing and Setting OBS
OBS Studio is available for all main operating systems such as Windows, Mac OS, and, Linux. You may get the utility by clicking here. Run and install the software to get started. When you launch the program for the first time, OBS Studio performs an Auto-Configuration Wizard. It provides you the choice of selecting between ‘Optimize for streaming’ and ‘Optimize for recording’. Click on the ‘Optimize for streaming’ if you wish to live broadcast your game. The wizard will next examine your system’s performance. It examines and helps adjust your system resolution, bitrate, encoder, and internet connection.
Step 3. Configuring OBS Studio for Streaming to Twitch
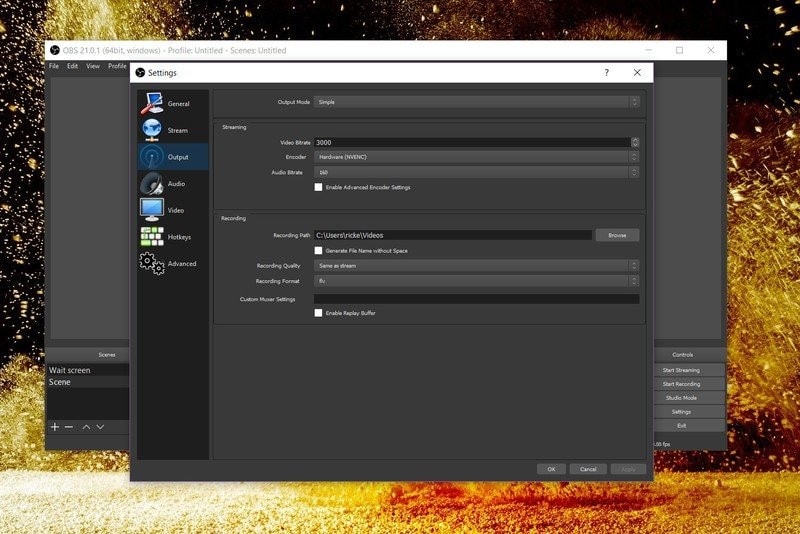
Now that you’re set up to the stream, the first step is to select your resolution, frame rate, and bitrate. The greater each of them, the more bandwidth and horsepower you’ll require from your PC. If you’ve got a high-speed internet connection and a strong PC, then you can probably stream at 1080p60 at a high bitrate. But you also need to balance this with offering a stream that’s not going to buffer like wild for your viewers who could be on poorer connections. Remember, if you’re not a partner on Twitch, you won’t have transcoding, thus the experience might be awful for viewers with sluggish connections.
Once you’re done setting up OBS, you can dig into the advanced capabilities such as OBS sceneries. These will allow you to dramatically boost your live stream production value. If you arrange your OBS scenes and sources appropriately, your broadcast may go from an ordinary-looking stream to one that appears slick and professional.
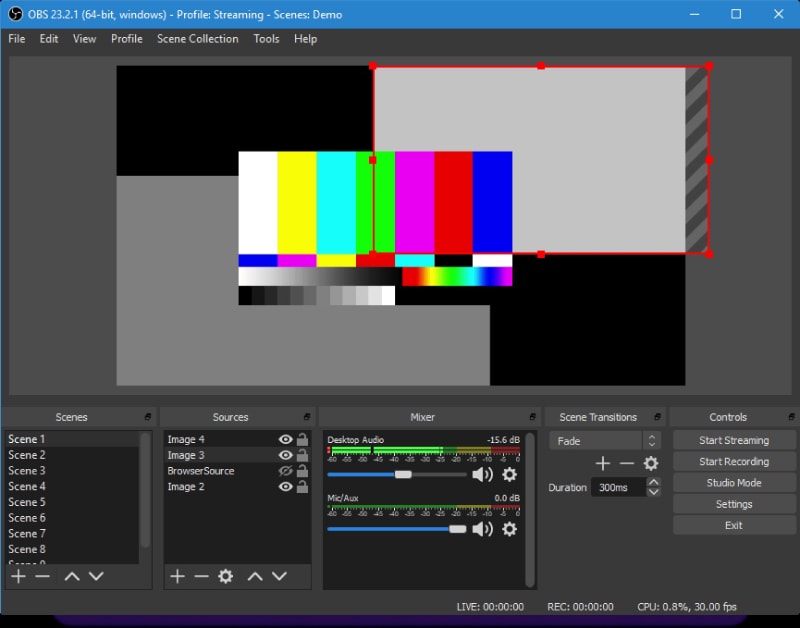
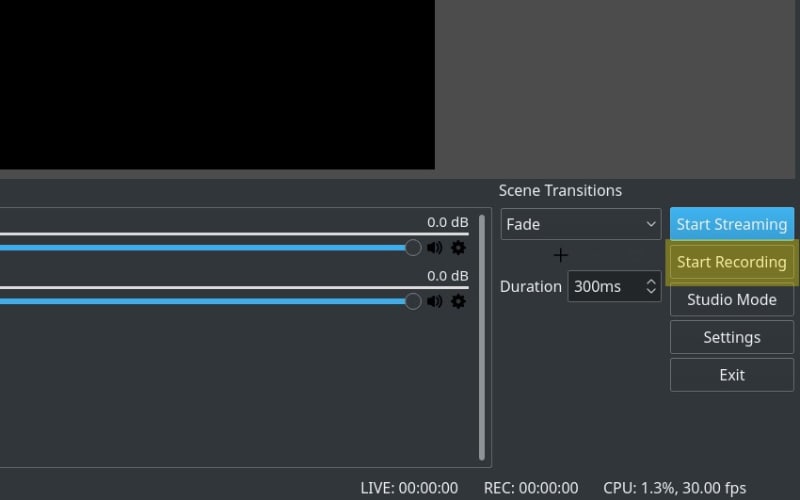
Step 4. Adding Scene and Sources
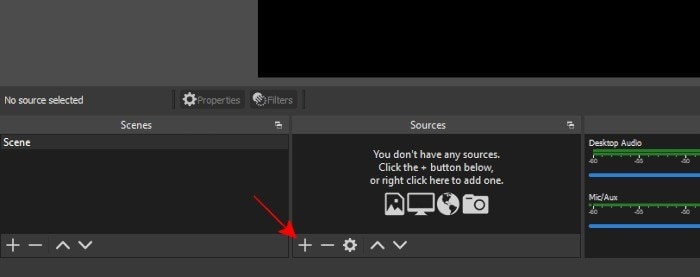
A scene may be simply added in OBS by clicking on the addition symbol indicated in the picture below. Once you have chosen this, you will simply be prompted to pick a name for the scene. All of your overlays, sources, and basic on-screen items will need to be introduced through a specified scene. Once you have created your scene and titled it, make sure it is chosen and proceed to the box on the right side of the picture below to click the plus symbol. This brings up the many sources you may pick from for your freshly constructed scenario. The good thing is, once you have inserted a source in one scene, you can simply use it again in another.
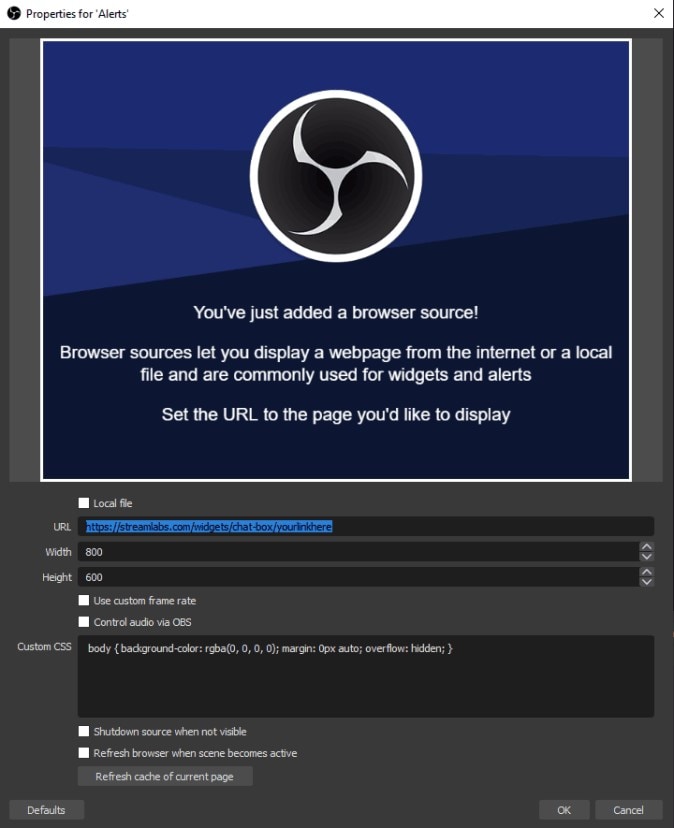
Step 5. Adding a Twitch Chat
Adding your twitch chat to your broadcasts may help make your viewers feel more included by enabling them to see their message live on the screen. You may add your Twitch chat box to your live broadcast in OBS by utilizing the browser source. The best practice when employing a chat box is to make sure to have your visuals, displays, and overlays set up to accommodate it. Get the widget URL from your favorite provider and copy it to your clipboard. This is what you will be adding to your OBS sources to add the chat to your overlay. If you’re using Twitch, this will be provided to you once you pick your basic settings for your chat style and layout. In the “Sources” section of OBS, go to the “+” in the bottom left corner, and pick, “Browser” to create a new browser source window.
Part 3: Stream to YouTube with OBS
You may get it by browsing OBS Studio’s official website. If you’re using Windows 11, you shouldn’t be concerned about compatibility, since OBS is completely tuned to function with it. You may also broadcast game videos on YouTube. YouTube Gaming is a service devoted to gaming content providers and their viewers. Similar to Twitch and Facebook Gaming, it’s YouTube’s area for the gaming community. Once you’re done downloading and installing OBS, run it. You should be welcomed with a window with a dark screen and objects below it.
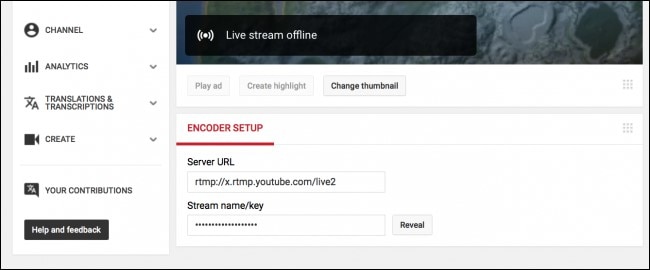
**Get your YouTube Stream Key
**Step 1: Create a YouTube account if you haven’t already
**Step 2: You can’t participate in YouTube live broadcasting unless you authenticate the account using a connected cell phone. Head to the verification page, log in to your account and follow the on-screen steps.
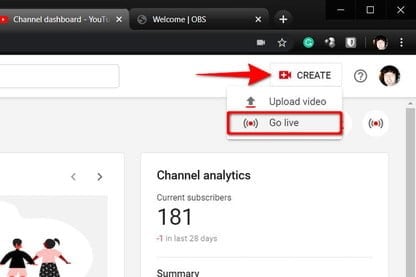
**Step 3: Once authenticated, it’s time to travel to YouTube Studio. Choose the Camera icon on the upper right-hand side of the main YouTube page and then select Go Live.
**Step 4: Now click Schedule Stream, and check to make sure that all the parameters are accurate and that the video is correctly labeled and described. When ready, choose Create Stream.

**Link OBS to YouTube
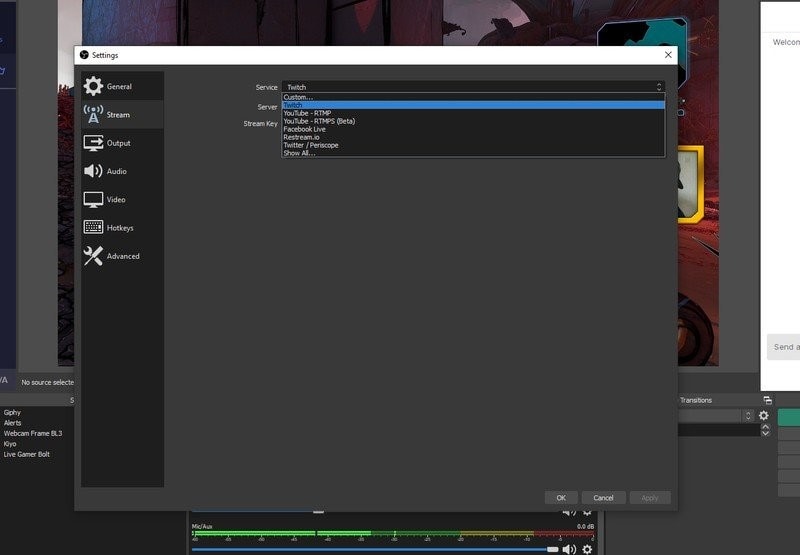
**Step 1: Download OBS from the official website and install it like you would any other application. Run it as an administrator, and proceed into the Settings panel using the appropriate button situated in the lower right corner.
**Step 2: Go to the Stream tab using the left-hand menu and pick YouTube -RTMPS from the Service drop-down box.
**Step 3: Click Audio on the left-hand menu. Each audio device on that page represents one possible audio source in your broadcast. If you want viewers to hear in-game or desktop audio, assign one of the Desktop Audio options to your system’s audio output. If you want your viewers to hear you, pick your microphone from the drop-down next to Mic/Auxiliary Audio.
**Step 4: In the main window, click the Plus symbol beneath the Sources heading near the bottom. If you wish to broadcast game video, choose Game Capture displayed on the pop-up menu. You have a couple of different choices for collecting your film. You may capture any full-screen program, a single window, or a foreground window. You may also enable transparency, capture third-party overlays, and more. Click OK to finish.

**Start Streaming
With all of the aforementioned settings in place and your YouTube channel ready to accept your broadcast, there’s only one thing to do: Start live streaming! If you want to start right now, click the Start Streaming button situated in the bottom right corner. Now it’s time to start streaming. To begin, click the Go Live icon in the upper left corner of your YouTube dashboard. Once the OBS makes the connection to YouTube, the broadcast will be available in the preview window.
Part 5: Conclusion
OBS is an open-source video recorder and live streaming program providing editions for Windows, macOS, and Linux. You can face difficulty with your YouTube live broadcast owing to problems with PC or internet performance. OBS enables you to access a log to discover a solution to your difficulties. OBS may broadcast videos to services that support real-time messaging protocol (RTMP), such as Twitch, Facebook Gaming, YouTube Gaming, and Instagram. But for gamers, it’s increasingly usual to broadcast on Twitch, Facebook, and YouTube.
Also read:
- [New] 2023 | Top 6 Facebook Lite Video Downloaders
- [New] In 2024, Map Masterpieces Excellent Quests for Gold
- [New] Navigating Account Creation on YouTube
- [New] Premium 12 Video Capture Apps, No Time Limit for 2024
- [Updated] 2024 Approved From Passive to Profitable 8 Beginner's Revenue Hacks for YouTube
- [Updated] ShotChrome Xtreme Top-Tier OS Capturing
- [Updated] Ultimate Compilation Top 11 Streaming Gear Insights
- 11 Best Location Changers for Vivo V29 | Dr.fone
- 2024 Approved Efficient Movie Recording Strategies Across Desktops and Handhents
- 2024 Approved Logitech Webcam 101 A Beginner's Guide to Video
- Assessing Daily Video Consumption in GB Units for 2024
- Can You Unlock iPhone 8 After Forgetting the Passcode?
- In 2024, Elevate Video Aesthetics to Meet Instagram Standards
- In 2024, Top 8 Free Software Solutions Revolutionizing Corporate Video Meetings
- Premier Video Call Alternatives Zoom's Rivalry Explained
- Syncing Gamepads Seamlessly on Android Phones/Tablets
- The Finest Open World Games to Engage With
- Top 6 Strategies: Leveraging ChatGPT for Career Hunting
- Top-Ranking Apple Watch Screen Guard: Exclusive Review of the Ideal Picks - Insights From ZDNet
- Title: [Updated] 2024 Approved The Essential Guide to Streaming Quality via OBS, YouTube & Twitch
- Author: Emma
- Created at : 2025-02-06 00:31:14
- Updated at : 2025-02-08 00:13:12
- Link: https://on-screen-recording.techidaily.com/updated-2024-approved-the-essential-guide-to-streaming-quality-via-obs-youtube-and-twitch/
- License: This work is licensed under CC BY-NC-SA 4.0.