![[Updated] Combating an Unresponsive OBS Camera Input Stream for 2024](https://thmb.techidaily.com/749e7224dc77351db9654f3d5b625401a4538e3e09d897a36274e3de6aadbd39.jpg)
[Updated] Combating an Unresponsive OBS Camera Input Stream for 2024
Combating an Unresponsive OBS Camera Input Stream
Open Broadcaster Software (OBS) is a free tool that enables you to broadcast music and video to internet platforms such as Facebook, Twitch, and YouTube. OBS virtual camera enables you to utilize a media resource such as video files, screenshots, apps, games, etc. as the camera output to Meet, or other Video conversations. Your conference partner will see the video source you just specified instead of your face via the camera. One of the most typical concerns that streamers would run across is that their video would, over time, become out of sync with the rest of the broadcast. For example, your microphone audio could line up with your lips at first, but there is a perceptible offset from the camera one hour into a broadcast. Luckily, these video sync difficulties with OBS are generally caused by a sampling rate mismatch. Thanks to its basic well-organized user interface, OBS is pretty easy to use and it operates smoothly as well.
Assuming you are a post for freeware that can do screen recording properly and profitably, an OBS screen recorder is warmly encouraged. Even better, its outstanding ability is to cope with live spillage by supporting numerous popular web-based features. In video conferencing software like Skype, Zoom, Teams, Google Meet, or Facebook Messenger Rooms, you may notice a video source issue labeled “OBS camera not showing” in the OBS Studio. And you may question what it is and how to utilize the virtual camera Virtually every streamer around the world knows about OBS (Open Broadcaster Software), a free open-sourced streaming and recording application. That being said, users of OBS still run into a handful of technical troubles from time to time and the “OBS camera not working” issue is a classic example. So OBS appears to fail to pick up your camera all of a sudden and you don’t know what to do to fix it? Then you have arrived in the correct spot as down below, you will discover some of the most common solutions to the problem of “OBS camera stops working” presently.
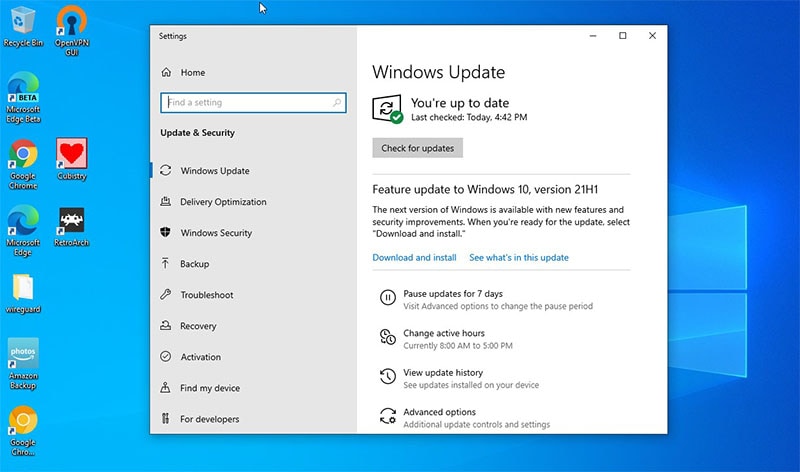
Method 1: Update to the Newest Windows Version
Regularly upgrading drivers and the newest versions of Windows can cure most issues on your computer, including OBS difficulties.
Method 2: Reinstall Webcam
Remember to verify your settings with a practice stream or video first, since everything can seem fine but have a stutter or flicker - all it’s about balancing the best choices Follow the instructions below to reinstall the webcam and repair the problem on OBS:
Step 1: First, open the Device Manager window.
Step 2: Find and right-click your camera in the list, choose Uninstall, then unplug the webcam from the computer. Wait a bit and reconnect the camera to the computer.
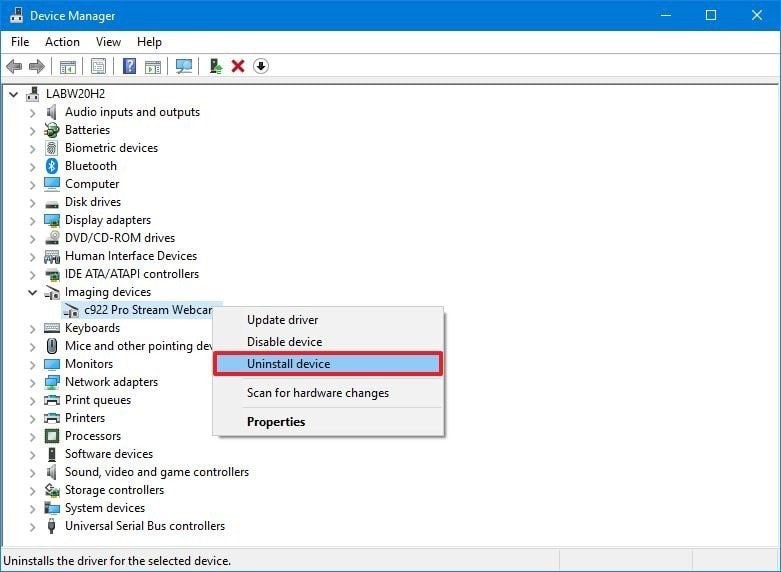
Step 3: Also, you may upgrade the camera driver from Device Manager by locating and right-clicking on the webcam, then choosing Update Driver then restarting your computer and checking if the issue remains.
Method 3: Fix Webcam Problem with OBS Not Functioning
There are several reasons why you may be seeing a blank screen where you expect to see your video feed - it could be a permissions problem, a software conflict, or a simple settings error on the website or app. As long as the camera isn’t physically damaged or malfunctioning, your difficulties may be quickly remedied by following a few easy troubleshooting procedures. In case other programs are utilizing the camera and producing the webcam not functioning issue on OBS.
If the issue continues, follow the procedures below to repair the fault:
Step 1: Open OBS on your PC and access Scenes (scene) and pick Scenes first.
Step 2: Open webcam settings by accessing the Source tab. Here, locate and double-click your webcam name.
Step 3: Check the options Deactivate When Not Showing. Perform the same processes for each scene in OBS.
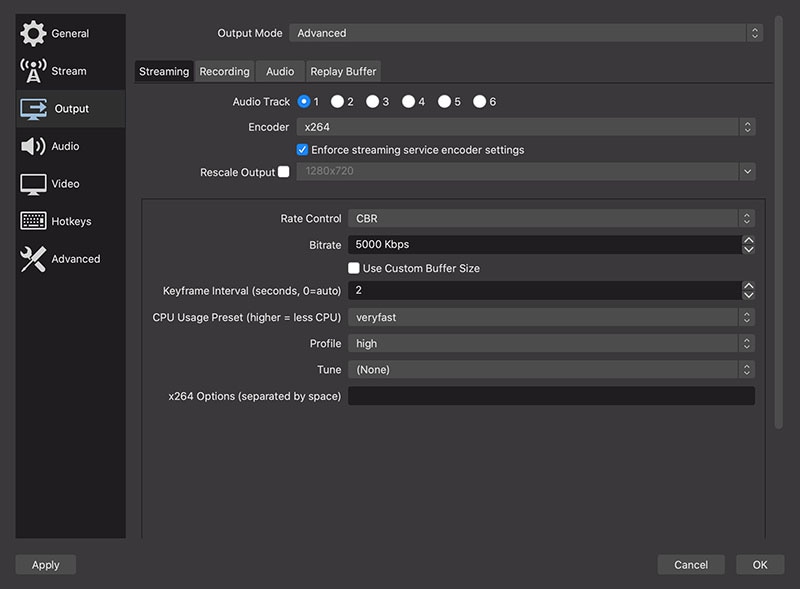
Method 4: Adjust Webcam Settings
If the webcam is still not functioning on OBS, visit the webcam settings by completing the same steps before and tweak items like camera resolution, FPS, video format, etc.
Method 5: Add Your Webcam as A Source
At the moment everything is set to default and you could notice your camera looks softer than it should and also cropped. Once you’re pleased with your choices, press Configure Video and this will bring up your camera’s attributes and settings. What you’ll have accessible to you can depend on your camera, but you’ll also have access to things like brightness, contrast, sharpness, and so on. Add your camera as a source and then right-click and pick Properties.
Use OBS Alternative to Record Screen
Although, OBS enables you to record numerous windows opened on your screen including games, programs, software, screen display, and more. It also has extra features apart from screen recording. Yet, its primary interface could overwhelm users, particularly novices. The primary interface of OBS loads with several buttons, which might be confusing. Whether you wonder if other applications operate as OBS replacements, the answer is a resounding yes. Filmora is a lightweight screen recorder that’s almost as popular with users as OBS because it concentrates on high-quality video recording. And although it has many of the same capabilities as OBS, it’s a lot simpler to come to grips with. It has many recording modes i.e., screen, gaming, and device, and those presets are a big help in getting set up.
OBS Studio takes some configuration and doesn’t “just operate” as various options do. As one of the options of OBS, Filmora is furthermore an expert screen recorder that carries comprehensive highlights for recording. Before you can record anything, you need to set input sources separately - screen, browser, camera, audio input, etc. And the user interface is not especially friendly. to patch up this shortage of OBS, customers host to resort to third-gathering applications like video editors for aid. OBS is regarded as the most remarkable freeware in the screen recorder business, when customers retained in its activities ultimately grow acclimated to it, OBS will change into their most expert right-hand associate of all time. It will draw in a lot of amateurs who don’t care for typical video modifying virtual items with muddled equipment strategy. Hence, Filmora is your top-notch alternative to handle the OBS camera not functioning problem. Here’s the detail about it.
To utilize Filmora as the best alternative to OBS Studio, follow the steps below to begin recording and storing your screen using the Filmora solution.
For Win 7 or later (64-bit)
For macOS 10.12 or later
Step 1: Install and Launch the Software
To start, visit the official website and download the Filmora installer for your preferred system. Afterward, install the program within your system to get started. For that, you may utilize this OBS Studio option on the move. Just visit the Wondershare official platform on the web and from there, you can discover both versions of Filmora software, i-e., Windows and Mac versions with the current version.

Step 2: Setup Webcam Recording
To personalize your webcam with the recording screen, firstly, you need to start with the New Project and then open the Screen recorder. For that, go to the File > Record Media and then choose your chosen format of screen recording from the options as shown above. It’ll transport you to the user-friendly UI of Filmora where you may pick up the recording capability on-spot as demonstrated in the image below:
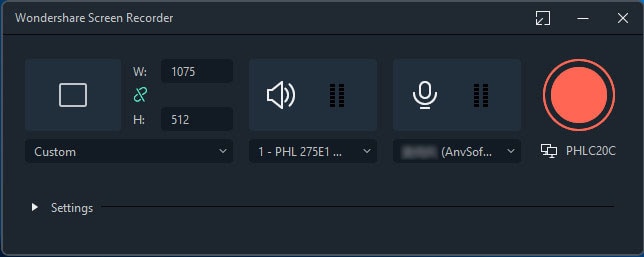
Step 3: Start Recording
To commence, just tap the Record button and it will start recording your personalized screen with the webcam straight immediately. And similar is the method after you’re done with the recording, tap the Stop button that’ll transport you inside the video editor to polish your recorded material.

Step 4: Save Webcam Recordings
In the end, after you’re done with different edits and modifications of the editing and recording, Filmora also enables you to publish your masterpiece straight to YouTube or any other recognized site, you may without much of a stretch pick your chosen platform to share from there. Just press the Export button as indicated above and it might provide several possibilities for you on the fly.
The Bottom Line
OBS Studio is especially popular in the gaming community since it helps you create video from numerous sources, mix your audio, set hotkeys to operate the recorder in full-screen mode, and then broadcast it live via Twitch and similar platforms or submit it to video sharing sites. if you want to make use of the capabilities of video recording and editing, consider Filmora. So, if you’re a newbie wishing to film your gaming sessions, Filmora is an OBS option you should explore. Filmora video editorial manager gives various essential parts including the potential to add overlays,3D Effects, and components, for example, GIF photos, music, and text to the recordings.
For macOS 10.12 or later
Step 1: Install and Launch the Software
To start, visit the official website and download the Filmora installer for your preferred system. Afterward, install the program within your system to get started. For that, you may utilize this OBS Studio option on the move. Just visit the Wondershare official platform on the web and from there, you can discover both versions of Filmora software, i-e., Windows and Mac versions with the current version.
Step 2: Setup Webcam Recording
To personalize your webcam with the recording screen, firstly, you need to start with the New Project and then open the Screen recorder. For that, go to the File > Record Media and then choose your chosen format of screen recording from the options as shown above. It’ll transport you to the user-friendly UI of Filmora where you may pick up the recording capability on-spot as demonstrated in the image below:
Step 3: Start Recording
To commence, just tap the Record button and it will start recording your personalized screen with the webcam straight immediately. And similar is the method after you’re done with the recording, tap the Stop button that’ll transport you inside the video editor to polish your recorded material.
Step 4: Save Webcam Recordings
In the end, after you’re done with different edits and modifications of the editing and recording, Filmora also enables you to publish your masterpiece straight to YouTube or any other recognized site, you may without much of a stretch pick your chosen platform to share from there. Just press the Export button as indicated above and it might provide several possibilities for you on the fly.
The Bottom Line
OBS Studio is especially popular in the gaming community since it helps you create video from numerous sources, mix your audio, set hotkeys to operate the recorder in full-screen mode, and then broadcast it live via Twitch and similar platforms or submit it to video sharing sites. if you want to make use of the capabilities of video recording and editing, consider Filmora. So, if you’re a newbie wishing to film your gaming sessions, Filmora is an OBS option you should explore. Filmora video editorial manager gives various essential parts including the potential to add overlays,3D Effects, and components, for example, GIF photos, music, and text to the recordings.
Also read:
- [New] 2024 Approved The Ultimate Roadmap for Spotify Ad Mastery
- [New] Premier Guide to Filmed Action Preservation for 2024
- [Updated] How To Retrieve Individual Frames From Windows Media Files
- [Updated] In 2024, Unlocking Instagram's Potential Elevating Content Impact
- [Updated] IPhone + Android Tutorial Screen Recording Google Meets for 2024
- [Updated] No Cash Needed for YouTube Audio? Check Out This List of 23 Crackers
- 2024 Approved DisplayCast Critique Service
- 5 Hassle-Free Solutions to Fake Location on Find My Friends Of Apple iPhone 14 Pro | Dr.fone
- Crossing Borders with Words: Immersion Made Simple
- Digital Video Capture A New Era's Insight
- Exploring Tom's Tech Insights and Hardware Evaluations
- In 2024, Cerebral Showcase - GK Video Challenge Network
- In 2024, Ultimate Guide to Free PPTP VPN For Beginners On Xiaomi Redmi K70 | Dr.fone
- ScreenSnapper's Journey Navigating the Latest Recorders for 2024
- Title: [Updated] Combating an Unresponsive OBS Camera Input Stream for 2024
- Author: Emma
- Created at : 2025-01-01 23:06:51
- Updated at : 2025-01-07 22:25:49
- Link: https://on-screen-recording.techidaily.com/updated-combating-an-unresponsive-obs-camera-input-stream-for-2024/
- License: This work is licensed under CC BY-NC-SA 4.0.