![[Updated] In 2024, How to Efficiently Capture Skype Meetings Across Windows and MacOS](https://thmb.techidaily.com/daed1459b71f2c11118ff363b82166df3949711b8db94af4f668119ff4d60331.jpg)
[Updated] In 2024, How to Efficiently Capture Skype Meetings Across Windows and MacOS
How to Efficiently Capture Skype Meetings Across Windows and MacOS
How to Record Skype Meeting on Windows and Mac | Skype for Business

Max Wales
Mar 27, 2024• Proven solutions
Skype for Business is an efficient and inexpensive unified communication platform offering many integral components for online communication. It can streamline all business communication needs and lets you record skype meeting directly from the app if you’re working from home or remotely and you want to capture meeting minutes or a presentation, study group discussions or a lecture, or preserve family moments forever.
You can take advantage of the recording feature to save yourself from constantly taking notes haphazardly, jotting one thing, and missing another important point in an online lecture for example. Here I’ll be introducing an amazing piece of software to record skype meeting. You will learn:
- Part 1: Recording Options on Skype for Business
- Part 2: How to Record Skype Meeting on Windows
- Part 3: How to Record Skype Meeting on Mac
- Part 4: Manage Your Skype Recordings

Part 1: Recording Options on Skype for Business
Skype for Business offers you several options for recording and managing your recorded video files. To access the recording options on Skype for Business follow the steps below.
- Press the “Gear icon” right next to the options menu. It will open an “Options” dialog box. Or you can also access the Options by clicking the downward-facing arrow next to the gear, then choosing the “Tools” and finally chose “Options”.
 WinUtilities Pro
- In the Options window, you’ll get a list of settings options on the left pane, press “Recording” to open the recording options.
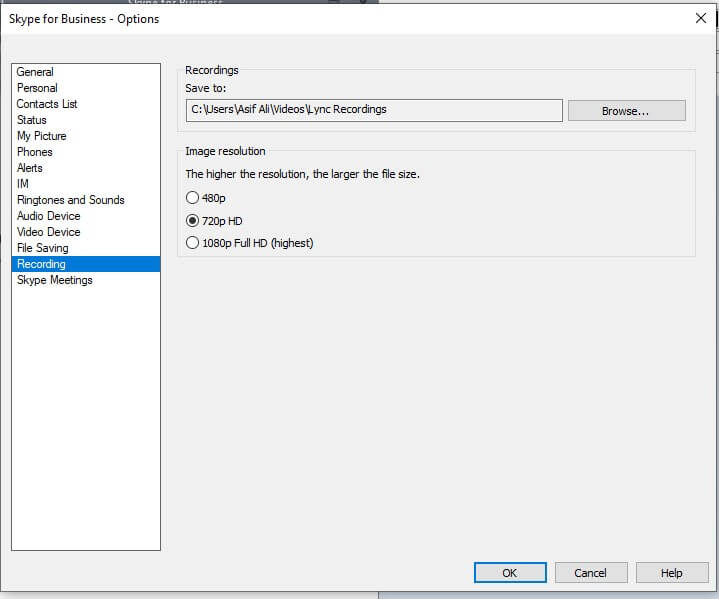
- Here you can determine the location where all the recordings will be saved. Also, you can select the video quality under the image resolution section.
Part 2: How to Record Skype Meeting on Windows
Skype for Business allows you to record skype meetings on Windows PCs directly from its app. It’s an easy and straightforward method of recording your meeting and I’ll go through every step to show you how you can record your next Skype meeting.
- Download Skype for Business to your computer and sign in with your business account.
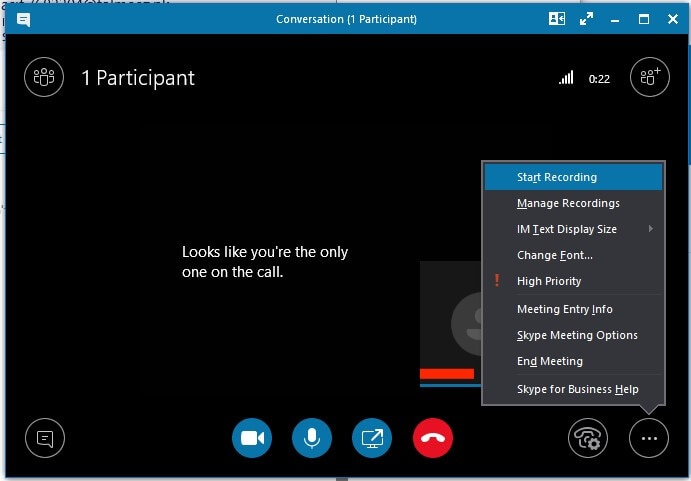
- Once you start or enter a meeting you can see the “More Options” button, press it, and select the “Start Recording” option. If the recording option is dimmed for you, your audio may not be connected. Press the mic icon to enable the audio and try again.
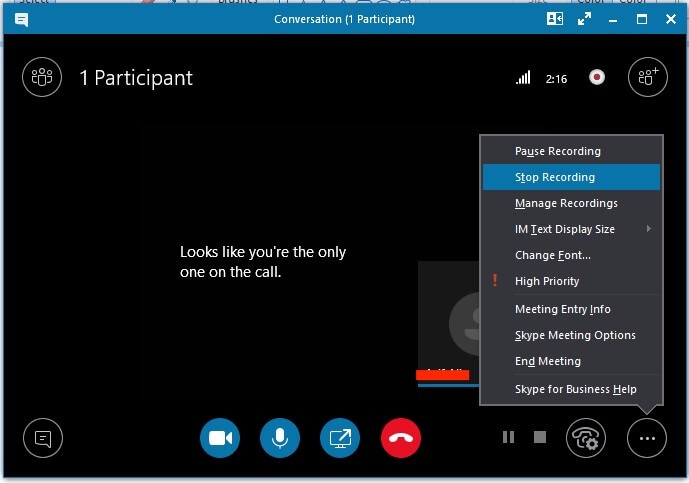
- Once you start the recording you can see the recording controls at the bottom of the meeting to pause, resume, or stop the recording.


- You can check who is recording the Skype meeting by pointing to the red recording button on the top right corner of the Skype meeting. When one or any of the participants is recording the Skype for Business meeting all the other participants will see this indicator.


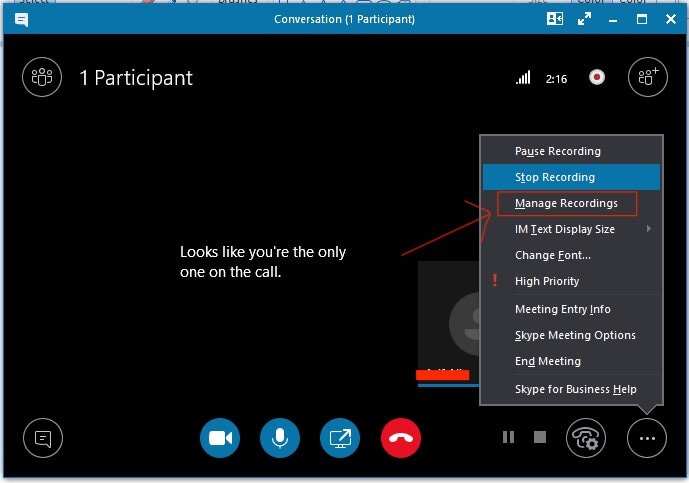
- After recording your family meeting or office presentation you want to save the recorded video, go to the same menu “More options” and press the “Stop Recording”.
- All the recordings will be stopped, and you’ll be notified.

- Skype for Business saves the recording automatically in an MP4 format that is compatible with Windows Media Player. The recording takes some time to process the meanwhile you can exit the meeting. Skype will show a notification when the recorded file is ready for viewing or sharing.
Part 3: How to Record Skype Meeting on Mac
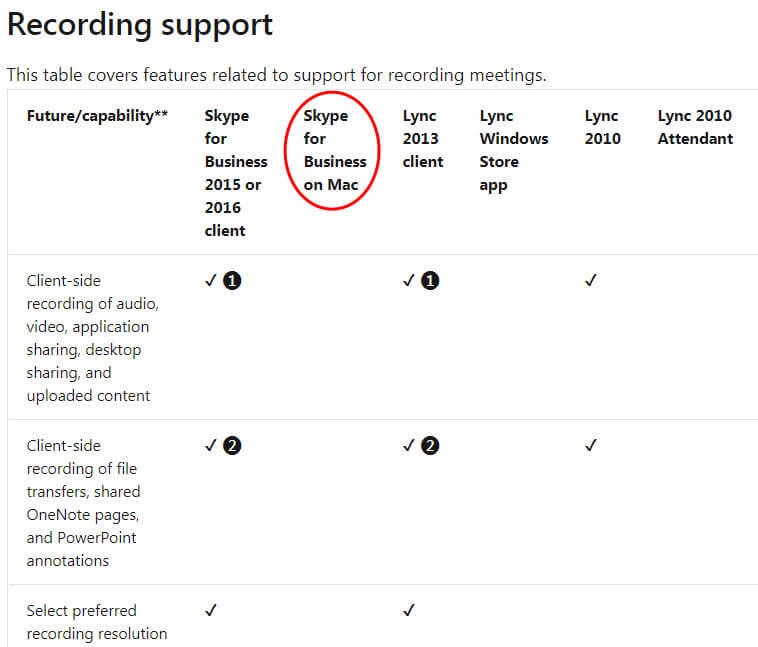
According to Microsoft guidelines, Microsoft has yet to introduce the recording feature to its Mac version of Skype for Business. Recording on Mac has not been made available.
Here you can try third-party software to record skype meeting. Wondershare Filmora is an amazing tool for video content creators and the general public at large that can be used to record Skype meeting with its flexible recording features. Access the recordings later to extract vital information from a meeting or share it with the participants. Filmora screen recording delivers high-quality 4K video output with a high framerate and best sound quality both from the connected microphone and computer audio system.
Let’s see how to record skype meeting on Mac using Wondershare Filmora:
- Download Filmora and install it on your computer system. It supports both Windows and Mac operating systems and offers a trial version for you to enjoy the tool freely.


- Open Filmora, then click on the “New Project” option to enter the full feature mode.


- Go to Record, then drop-down the menu, and chose the “Record PC Screen” option.

- Now head over to the skype meeting you want to record.
- You will be prompted with Wondershare Filmora Scrn recorder options i.e. in case you want Full-Screen recording, audio, and microphone options. Once you press the record (red) button filmora will start the countdown to recording the screen.
 Project Manager - Asset Browser for 3Ds Max

- You can confirm if the software is recording your screen or not by looking at the top menu bar, a red recording button will be displayed during the whole screen recording. To pause or stop the skype meeting being recorded press the red button on the top menu bar.

- Press the Stop button to finish recording the skype meeting. You’ll be taken back to the filmora editor window where you can tweak around with the recorded meeting.
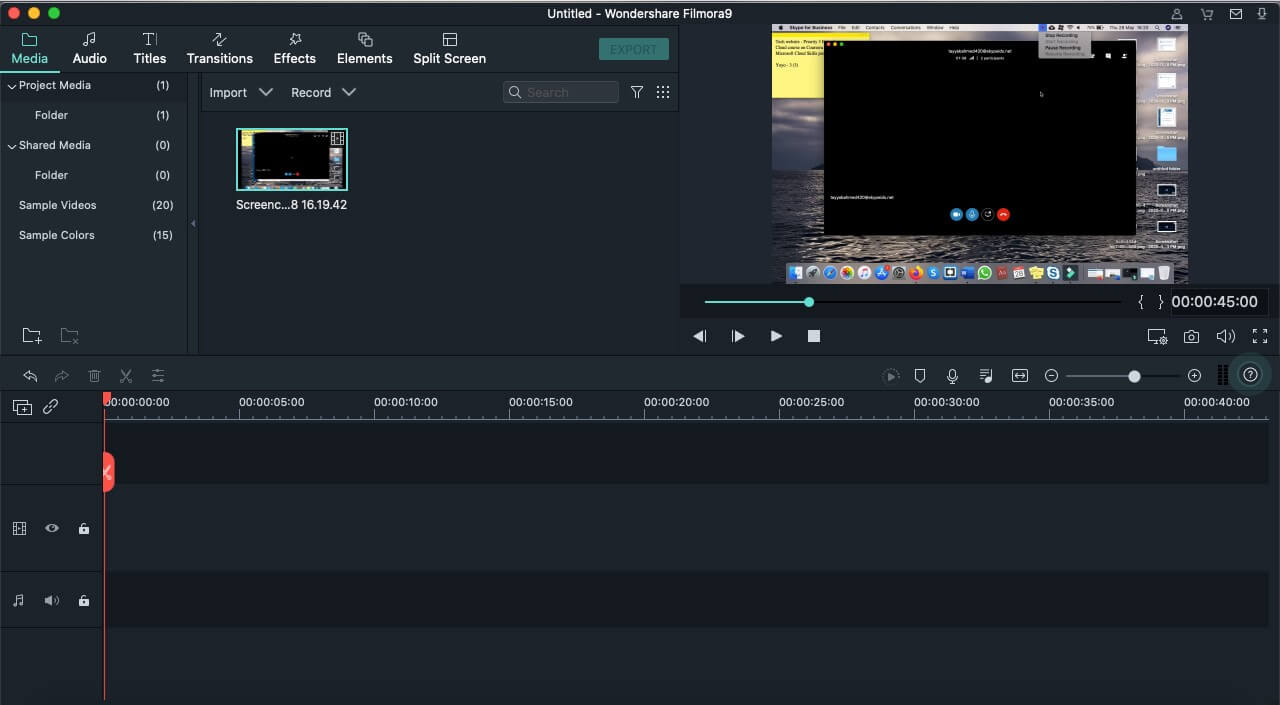
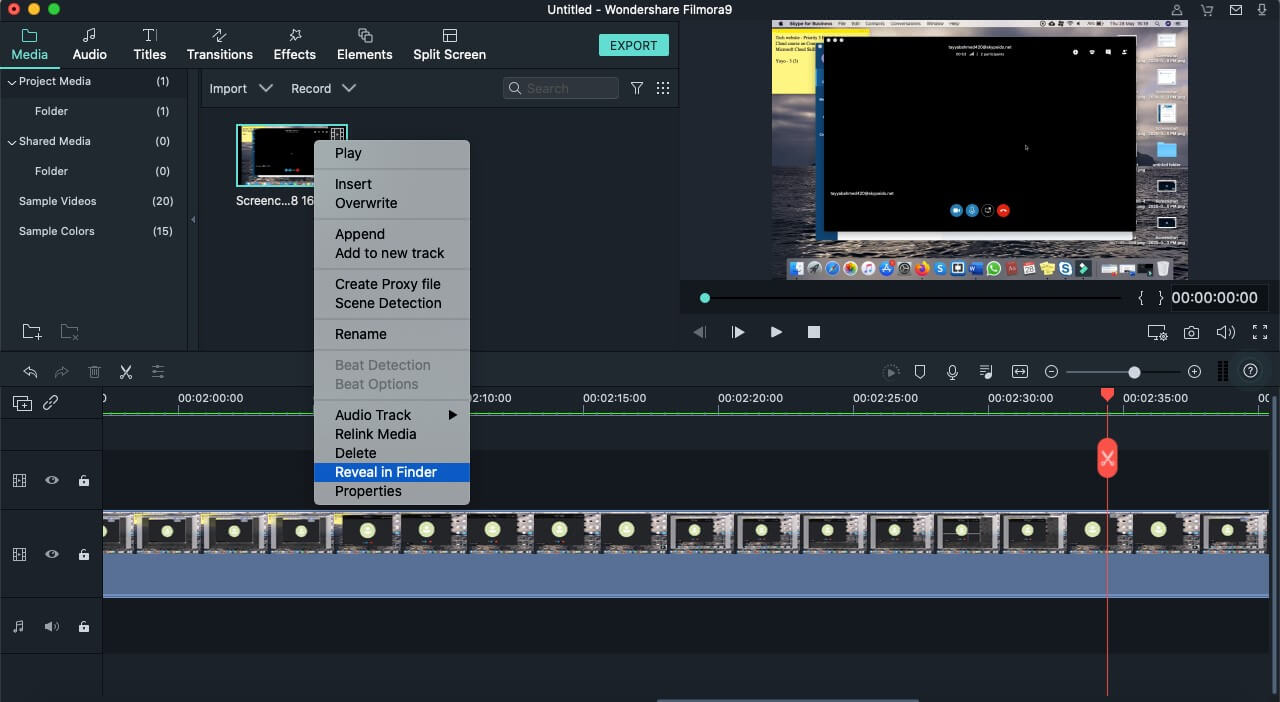
- You can locate the recorded file by right-clicking the recorded file in the media library and selecting the “Reveal in Explorer” option.
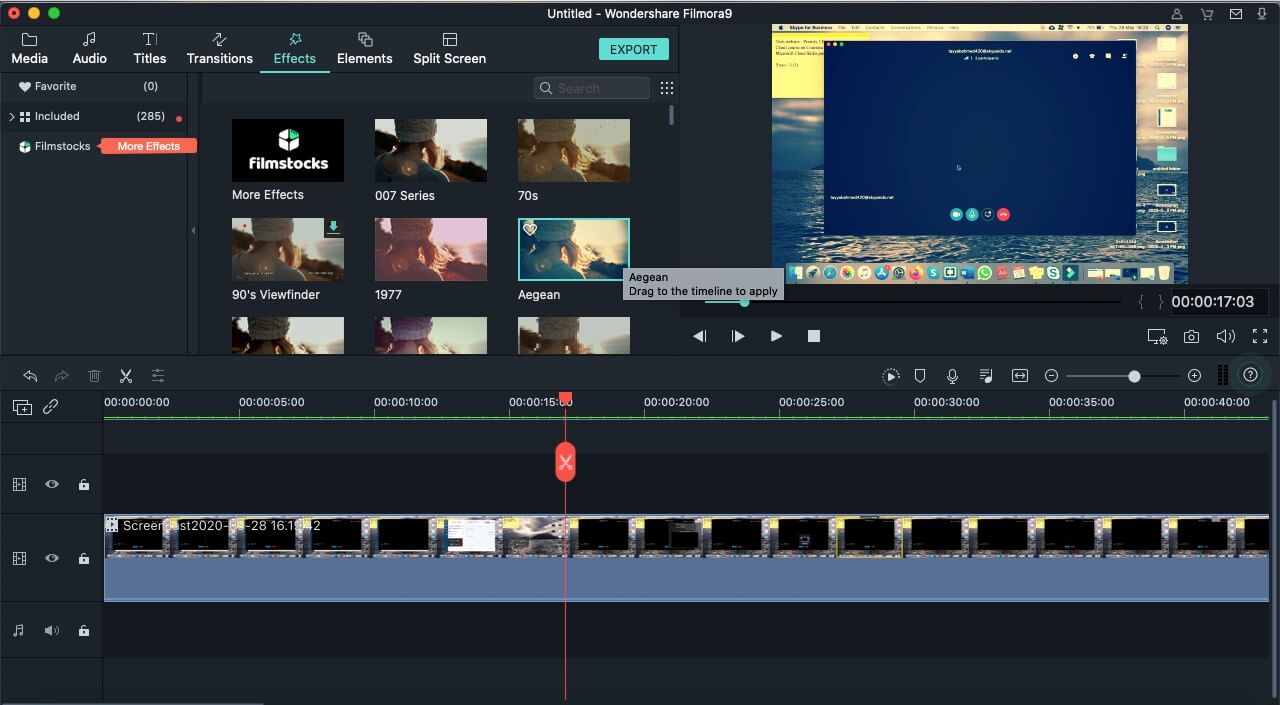
- You can drag and drop the recorded file to the timeline if you want to edit it. Filmora can easily cut, trim, rotate, layer multiple video effects, and much more. That’s up to you how deep you want to dig into the features of this amazing video editing toolkit.

WPS Office Premium ( File Recovery, Photo Scanning, Convert PDF)–Yearly
Part 4: Manage Your Recordings
The Skype for Business recording manager allows you to view all the recordings and prepare them for sharing. You can open the recording manager in two ways:
- one way is to open it from the Skype for Business main window by pressing the down arrow or drop-down menu next to the settings icon. Then select “Tools” and “Recording Manager” from the list.
- You will see “More Options” menu and selects the Recording Manager to open it.
Now that you have access to Skype for Business Recording Manager, you can view a recording, play it, browse its location, rename it, delete it, and publish it online for your viewers.
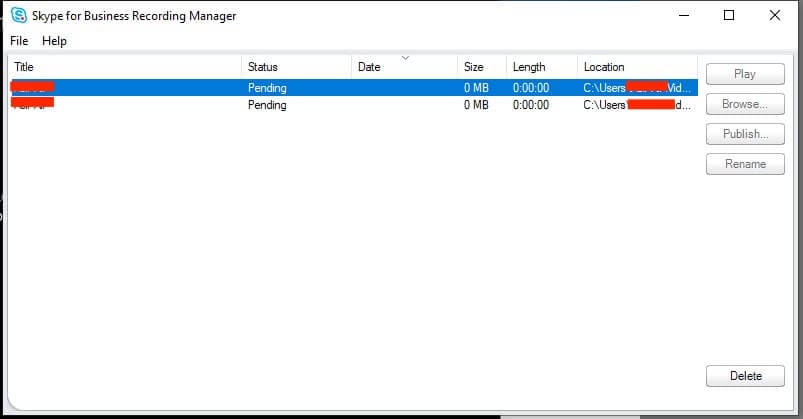
To prepare it for sharing with other participants, click on the “Publish” button. It will open a “Save and Publish” window where you can name the recording file, specify the location to save, and under the options chose what parts of the meeting to include i.e. video, audio, panorama video, messaging, and presented content. When everything is ready press the “OK” button to save the recorded meeting.
Conclusion
Skype for Business allows the presenters to record skype meeting with all the details like video, audio, PowerPoint slides, etc. The in-app recording feature records every members’ video and audio at the same time. For the limitations of call recording on Mac, Wondershare Filmora can also be a good choice for you. It offers unparalleled features with an intuitive design, and you can record unlimited Skype calls and that with no limitation on Windows or Mac computer systems.

WPS Office Premium ( File Recovery, Photo Scanning, Convert PDF)–Yearly
Max Wales
Max Wales is a writer and a lover of all things video.
Follow @Max Wales
Max Wales
Mar 27, 2024• Proven solutions
Skype for Business is an efficient and inexpensive unified communication platform offering many integral components for online communication. It can streamline all business communication needs and lets you record skype meeting directly from the app if you’re working from home or remotely and you want to capture meeting minutes or a presentation, study group discussions or a lecture, or preserve family moments forever.
You can take advantage of the recording feature to save yourself from constantly taking notes haphazardly, jotting one thing, and missing another important point in an online lecture for example. Here I’ll be introducing an amazing piece of software to record skype meeting. You will learn:
- Part 1: Recording Options on Skype for Business
- Part 2: How to Record Skype Meeting on Windows
- Part 3: How to Record Skype Meeting on Mac
- Part 4: Manage Your Skype Recordings
Part 1: Recording Options on Skype for Business
Skype for Business offers you several options for recording and managing your recorded video files. To access the recording options on Skype for Business follow the steps below.
- Press the “Gear icon” right next to the options menu. It will open an “Options” dialog box. Or you can also access the Options by clicking the downward-facing arrow next to the gear, then choosing the “Tools” and finally chose “Options”.
- In the Options window, you’ll get a list of settings options on the left pane, press “Recording” to open the recording options.
- Here you can determine the location where all the recordings will be saved. Also, you can select the video quality under the image resolution section.
Part 2: How to Record Skype Meeting on Windows
Skype for Business allows you to record skype meetings on Windows PCs directly from its app. It’s an easy and straightforward method of recording your meeting and I’ll go through every step to show you how you can record your next Skype meeting.
- Download Skype for Business to your computer and sign in with your business account.
- Once you start or enter a meeting you can see the “More Options” button, press it, and select the “Start Recording” option. If the recording option is dimmed for you, your audio may not be connected. Press the mic icon to enable the audio and try again.
- Once you start the recording you can see the recording controls at the bottom of the meeting to pause, resume, or stop the recording.
- You can check who is recording the Skype meeting by pointing to the red recording button on the top right corner of the Skype meeting. When one or any of the participants is recording the Skype for Business meeting all the other participants will see this indicator.
- After recording your family meeting or office presentation you want to save the recorded video, go to the same menu “More options” and press the “Stop Recording”.
- All the recordings will be stopped, and you’ll be notified.
- Skype for Business saves the recording automatically in an MP4 format that is compatible with Windows Media Player. The recording takes some time to process the meanwhile you can exit the meeting. Skype will show a notification when the recorded file is ready for viewing or sharing.
Part 3: How to Record Skype Meeting on Mac
According to Microsoft guidelines, Microsoft has yet to introduce the recording feature to its Mac version of Skype for Business. Recording on Mac has not been made available.
Here you can try third-party software to record skype meeting. Wondershare Filmora is an amazing tool for video content creators and the general public at large that can be used to record Skype meeting with its flexible recording features. Access the recordings later to extract vital information from a meeting or share it with the participants. Filmora screen recording delivers high-quality 4K video output with a high framerate and best sound quality both from the connected microphone and computer audio system.
Let’s see how to record skype meeting on Mac using Wondershare Filmora:
- Download Filmora and install it on your computer system. It supports both Windows and Mac operating systems and offers a trial version for you to enjoy the tool freely.
- Open Filmora, then click on the “New Project” option to enter the full feature mode.
- Go to Record, then drop-down the menu, and chose the “Record PC Screen” option.

- Now head over to the skype meeting you want to record.
- You will be prompted with Wondershare Filmora Scrn recorder options i.e. in case you want Full-Screen recording, audio, and microphone options. Once you press the record (red) button filmora will start the countdown to recording the screen.
- You can confirm if the software is recording your screen or not by looking at the top menu bar, a red recording button will be displayed during the whole screen recording. To pause or stop the skype meeting being recorded press the red button on the top menu bar.
- Press the Stop button to finish recording the skype meeting. You’ll be taken back to the filmora editor window where you can tweak around with the recorded meeting.
- You can locate the recorded file by right-clicking the recorded file in the media library and selecting the “Reveal in Explorer” option.
- You can drag and drop the recorded file to the timeline if you want to edit it. Filmora can easily cut, trim, rotate, layer multiple video effects, and much more. That’s up to you how deep you want to dig into the features of this amazing video editing toolkit.
Part 4: Manage Your Recordings
The Skype for Business recording manager allows you to view all the recordings and prepare them for sharing. You can open the recording manager in two ways:
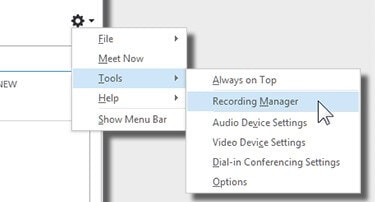
- one way is to open it from the Skype for Business main window by pressing the down arrow or drop-down menu next to the settings icon. Then select “Tools” and “Recording Manager” from the list.
- You will see “More Options” menu and selects the Recording Manager to open it.
 Nero Burning ROM:
The ultimate burning program for all your needs!
Now that you have access to Skype for Business Recording Manager, you can view a recording, play it, browse its location, rename it, delete it, and publish it online for your viewers.
To prepare it for sharing with other participants, click on the “Publish” button. It will open a “Save and Publish” window where you can name the recording file, specify the location to save, and under the options chose what parts of the meeting to include i.e. video, audio, panorama video, messaging, and presented content. When everything is ready press the “OK” button to save the recorded meeting.

Conclusion
Skype for Business allows the presenters to record skype meeting with all the details like video, audio, PowerPoint slides, etc. The in-app recording feature records every members’ video and audio at the same time. For the limitations of call recording on Mac, Wondershare Filmora can also be a good choice for you. It offers unparalleled features with an intuitive design, and you can record unlimited Skype calls and that with no limitation on Windows or Mac computer systems.
Max Wales
Max Wales is a writer and a lover of all things video.
Follow @Max Wales
Max Wales
Mar 27, 2024• Proven solutions
Skype for Business is an efficient and inexpensive unified communication platform offering many integral components for online communication. It can streamline all business communication needs and lets you record skype meeting directly from the app if you’re working from home or remotely and you want to capture meeting minutes or a presentation, study group discussions or a lecture, or preserve family moments forever.
You can take advantage of the recording feature to save yourself from constantly taking notes haphazardly, jotting one thing, and missing another important point in an online lecture for example. Here I’ll be introducing an amazing piece of software to record skype meeting. You will learn:
- Part 1: Recording Options on Skype for Business
- Part 2: How to Record Skype Meeting on Windows
- Part 3: How to Record Skype Meeting on Mac
- Part 4: Manage Your Skype Recordings
Part 1: Recording Options on Skype for Business
Skype for Business offers you several options for recording and managing your recorded video files. To access the recording options on Skype for Business follow the steps below.
- Press the “Gear icon” right next to the options menu. It will open an “Options” dialog box. Or you can also access the Options by clicking the downward-facing arrow next to the gear, then choosing the “Tools” and finally chose “Options”.
- In the Options window, you’ll get a list of settings options on the left pane, press “Recording” to open the recording options.
- Here you can determine the location where all the recordings will be saved. Also, you can select the video quality under the image resolution section.
Part 2: How to Record Skype Meeting on Windows
Skype for Business allows you to record skype meetings on Windows PCs directly from its app. It’s an easy and straightforward method of recording your meeting and I’ll go through every step to show you how you can record your next Skype meeting.
- Download Skype for Business to your computer and sign in with your business account.
- Once you start or enter a meeting you can see the “More Options” button, press it, and select the “Start Recording” option. If the recording option is dimmed for you, your audio may not be connected. Press the mic icon to enable the audio and try again.
- Once you start the recording you can see the recording controls at the bottom of the meeting to pause, resume, or stop the recording.
- You can check who is recording the Skype meeting by pointing to the red recording button on the top right corner of the Skype meeting. When one or any of the participants is recording the Skype for Business meeting all the other participants will see this indicator.
- After recording your family meeting or office presentation you want to save the recorded video, go to the same menu “More options” and press the “Stop Recording”.

- All the recordings will be stopped, and you’ll be notified.
- Skype for Business saves the recording automatically in an MP4 format that is compatible with Windows Media Player. The recording takes some time to process the meanwhile you can exit the meeting. Skype will show a notification when the recorded file is ready for viewing or sharing.
Part 3: How to Record Skype Meeting on Mac
According to Microsoft guidelines, Microsoft has yet to introduce the recording feature to its Mac version of Skype for Business. Recording on Mac has not been made available.
Here you can try third-party software to record skype meeting. Wondershare Filmora is an amazing tool for video content creators and the general public at large that can be used to record Skype meeting with its flexible recording features. Access the recordings later to extract vital information from a meeting or share it with the participants. Filmora screen recording delivers high-quality 4K video output with a high framerate and best sound quality both from the connected microphone and computer audio system.
Let’s see how to record skype meeting on Mac using Wondershare Filmora:
- Download Filmora and install it on your computer system. It supports both Windows and Mac operating systems and offers a trial version for you to enjoy the tool freely.
![]() FX PRO (Gold Robot + Silver Robot(Basic Package))
FX PRO (Gold Robot + Silver Robot(Basic Package))
- Open Filmora, then click on the “New Project” option to enter the full feature mode.
- Go to Record, then drop-down the menu, and chose the “Record PC Screen” option.
- Now head over to the skype meeting you want to record.
- You will be prompted with Wondershare Filmora Scrn recorder options i.e. in case you want Full-Screen recording, audio, and microphone options. Once you press the record (red) button filmora will start the countdown to recording the screen.
- You can confirm if the software is recording your screen or not by looking at the top menu bar, a red recording button will be displayed during the whole screen recording. To pause or stop the skype meeting being recorded press the red button on the top menu bar.
- Press the Stop button to finish recording the skype meeting. You’ll be taken back to the filmora editor window where you can tweak around with the recorded meeting.
- You can locate the recorded file by right-clicking the recorded file in the media library and selecting the “Reveal in Explorer” option.
- You can drag and drop the recorded file to the timeline if you want to edit it. Filmora can easily cut, trim, rotate, layer multiple video effects, and much more. That’s up to you how deep you want to dig into the features of this amazing video editing toolkit.
Part 4: Manage Your Recordings
The Skype for Business recording manager allows you to view all the recordings and prepare them for sharing. You can open the recording manager in two ways:
- one way is to open it from the Skype for Business main window by pressing the down arrow or drop-down menu next to the settings icon. Then select “Tools” and “Recording Manager” from the list.
- You will see “More Options” menu and selects the Recording Manager to open it.
Now that you have access to Skype for Business Recording Manager, you can view a recording, play it, browse its location, rename it, delete it, and publish it online for your viewers.

To prepare it for sharing with other participants, click on the “Publish” button. It will open a “Save and Publish” window where you can name the recording file, specify the location to save, and under the options chose what parts of the meeting to include i.e. video, audio, panorama video, messaging, and presented content. When everything is ready press the “OK” button to save the recorded meeting.
Conclusion
Skype for Business allows the presenters to record skype meeting with all the details like video, audio, PowerPoint slides, etc. The in-app recording feature records every members’ video and audio at the same time. For the limitations of call recording on Mac, Wondershare Filmora can also be a good choice for you. It offers unparalleled features with an intuitive design, and you can record unlimited Skype calls and that with no limitation on Windows or Mac computer systems.

Max Wales
Max Wales is a writer and a lover of all things video.
Follow @Max Wales
Max Wales
Mar 27, 2024• Proven solutions
Skype for Business is an efficient and inexpensive unified communication platform offering many integral components for online communication. It can streamline all business communication needs and lets you record skype meeting directly from the app if you’re working from home or remotely and you want to capture meeting minutes or a presentation, study group discussions or a lecture, or preserve family moments forever.
You can take advantage of the recording feature to save yourself from constantly taking notes haphazardly, jotting one thing, and missing another important point in an online lecture for example. Here I’ll be introducing an amazing piece of software to record skype meeting. You will learn:
- Part 1: Recording Options on Skype for Business
- Part 2: How to Record Skype Meeting on Windows
- Part 3: How to Record Skype Meeting on Mac
- Part 4: Manage Your Skype Recordings
Part 1: Recording Options on Skype for Business
Skype for Business offers you several options for recording and managing your recorded video files. To access the recording options on Skype for Business follow the steps below.
- Press the “Gear icon” right next to the options menu. It will open an “Options” dialog box. Or you can also access the Options by clicking the downward-facing arrow next to the gear, then choosing the “Tools” and finally chose “Options”.
- In the Options window, you’ll get a list of settings options on the left pane, press “Recording” to open the recording options.

- Here you can determine the location where all the recordings will be saved. Also, you can select the video quality under the image resolution section.

Part 2: How to Record Skype Meeting on Windows
Skype for Business allows you to record skype meetings on Windows PCs directly from its app. It’s an easy and straightforward method of recording your meeting and I’ll go through every step to show you how you can record your next Skype meeting.
- Download Skype for Business to your computer and sign in with your business account.
- Once you start or enter a meeting you can see the “More Options” button, press it, and select the “Start Recording” option. If the recording option is dimmed for you, your audio may not be connected. Press the mic icon to enable the audio and try again.
- Once you start the recording you can see the recording controls at the bottom of the meeting to pause, resume, or stop the recording.
- You can check who is recording the Skype meeting by pointing to the red recording button on the top right corner of the Skype meeting. When one or any of the participants is recording the Skype for Business meeting all the other participants will see this indicator.
- After recording your family meeting or office presentation you want to save the recorded video, go to the same menu “More options” and press the “Stop Recording”.
 PCDJ Karaoki is the complete professional karaoke software designed for KJs and karaoke venues. Karaoki includes an advanced automatic singer rotation list with singer history, key control, news ticker, next singers screen, a song book exporter and printer, a jukebox background music player and many other features designed so you can host karaoke shows faster and easier!
- All the recordings will be stopped, and you’ll be notified.
- Skype for Business saves the recording automatically in an MP4 format that is compatible with Windows Media Player. The recording takes some time to process the meanwhile you can exit the meeting. Skype will show a notification when the recorded file is ready for viewing or sharing.
Part 3: How to Record Skype Meeting on Mac
According to Microsoft guidelines, Microsoft has yet to introduce the recording feature to its Mac version of Skype for Business. Recording on Mac has not been made available.
Here you can try third-party software to record skype meeting. Wondershare Filmora is an amazing tool for video content creators and the general public at large that can be used to record Skype meeting with its flexible recording features. Access the recordings later to extract vital information from a meeting or share it with the participants. Filmora screen recording delivers high-quality 4K video output with a high framerate and best sound quality both from the connected microphone and computer audio system.
Let’s see how to record skype meeting on Mac using Wondershare Filmora:
- Download Filmora and install it on your computer system. It supports both Windows and Mac operating systems and offers a trial version for you to enjoy the tool freely.
- Open Filmora, then click on the “New Project” option to enter the full feature mode.
- Go to Record, then drop-down the menu, and chose the “Record PC Screen” option.
- Now head over to the skype meeting you want to record.
- You will be prompted with Wondershare Filmora Scrn recorder options i.e. in case you want Full-Screen recording, audio, and microphone options. Once you press the record (red) button filmora will start the countdown to recording the screen.

- You can confirm if the software is recording your screen or not by looking at the top menu bar, a red recording button will be displayed during the whole screen recording. To pause or stop the skype meeting being recorded press the red button on the top menu bar.
- Press the Stop button to finish recording the skype meeting. You’ll be taken back to the filmora editor window where you can tweak around with the recorded meeting.

- You can locate the recorded file by right-clicking the recorded file in the media library and selecting the “Reveal in Explorer” option.
 Power Tools add-on for Google Sheets, Lifetime subscription
- You can drag and drop the recorded file to the timeline if you want to edit it. Filmora can easily cut, trim, rotate, layer multiple video effects, and much more. That’s up to you how deep you want to dig into the features of this amazing video editing toolkit.
Part 4: Manage Your Recordings
The Skype for Business recording manager allows you to view all the recordings and prepare them for sharing. You can open the recording manager in two ways:
- one way is to open it from the Skype for Business main window by pressing the down arrow or drop-down menu next to the settings icon. Then select “Tools” and “Recording Manager” from the list.
- You will see “More Options” menu and selects the Recording Manager to open it.
 Project Manager - Asset Browser for 3Ds Max
Now that you have access to Skype for Business Recording Manager, you can view a recording, play it, browse its location, rename it, delete it, and publish it online for your viewers.
To prepare it for sharing with other participants, click on the “Publish” button. It will open a “Save and Publish” window where you can name the recording file, specify the location to save, and under the options chose what parts of the meeting to include i.e. video, audio, panorama video, messaging, and presented content. When everything is ready press the “OK” button to save the recorded meeting.
Conclusion
Skype for Business allows the presenters to record skype meeting with all the details like video, audio, PowerPoint slides, etc. The in-app recording feature records every members’ video and audio at the same time. For the limitations of call recording on Mac, Wondershare Filmora can also be a good choice for you. It offers unparalleled features with an intuitive design, and you can record unlimited Skype calls and that with no limitation on Windows or Mac computer systems.
Max Wales
Max Wales is a writer and a lover of all things video.
Follow @Max Wales
- Title: [Updated] In 2024, How to Efficiently Capture Skype Meetings Across Windows and MacOS
- Author: Emma
- Created at : 2024-07-24 09:54:40
- Updated at : 2024-07-25 09:54:40
- Link: https://on-screen-recording.techidaily.com/updated-in-2024-how-to-efficiently-capture-skype-meetings-across-windows-and-macos/
- License: This work is licensed under CC BY-NC-SA 4.0.