![[Updated] Innovative Mac Image Recording The Top 5 Cutting-Edge Techniques for 2024](https://thmb.techidaily.com/238e2de8d5663845563adee13d68f244664dc4975f435870883240d8e13b1f76.jpg)
"[Updated] Innovative Mac Image Recording The Top 5 Cutting-Edge Techniques for 2024"
Innovative Mac Image Recording: The Top 5 Cutting-Edge Techniques
How to Screenshot on Mac - 5 Simple Ways


Max Wales
Apr 18, 2024• Proven solutions
Unlike Windows PC, Mac computer doesn’t own the “PrintScreen” shortcut button to 1-click screenshot of the screen. However, we find the other way to take snapshots or screen records on Mac. Besides, if you want to know the shortcut keyboard command on Mac, just keep reading.
- Part 1: How to Make Screen Record and Screenshots on Mac - Edit After Screenshots
- Part 2: 4 Methods to Capture Screenshots on Mac Itself

Part 1: How to Make Screen Record and Screenshots on Mac
Here, we would like to recommend a tool for making screenshots and screen recordings at the same time. Filmora Screen Recorder can easily capture and record the operation on a Mac. Below are the 3 ways to start the function. Now download and install Filmora on Mac first, then keep reading.
Easy to Make Screenshots on Mac

 Secure Download
Easy to Make Screenshots on Mac


Supported System: macOS V14 (Sonoma), macOS V13 (Ventura), macOS V12 (Monterey), macOS v11 (Big Sur), macOS v10.15 (Catalina).
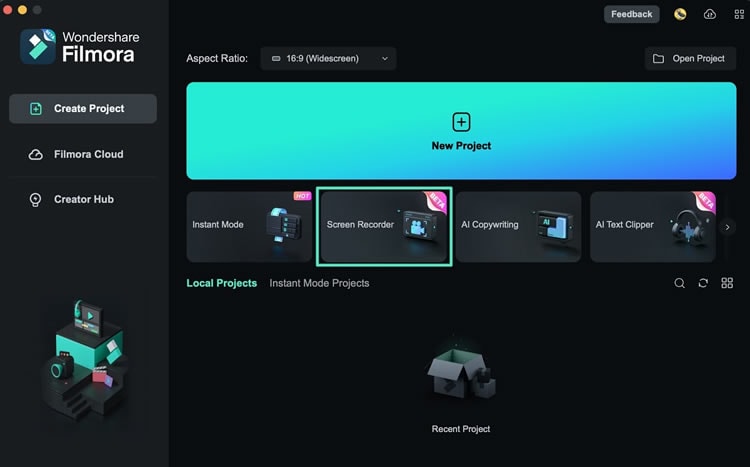
Step 1: Here are the entrance you can find on Filmora to launch the Screen Recorder function:
1. From the Start Interface
While you launch Filmora, you will see “Screen Recorder“ tab directly. Just click on it.
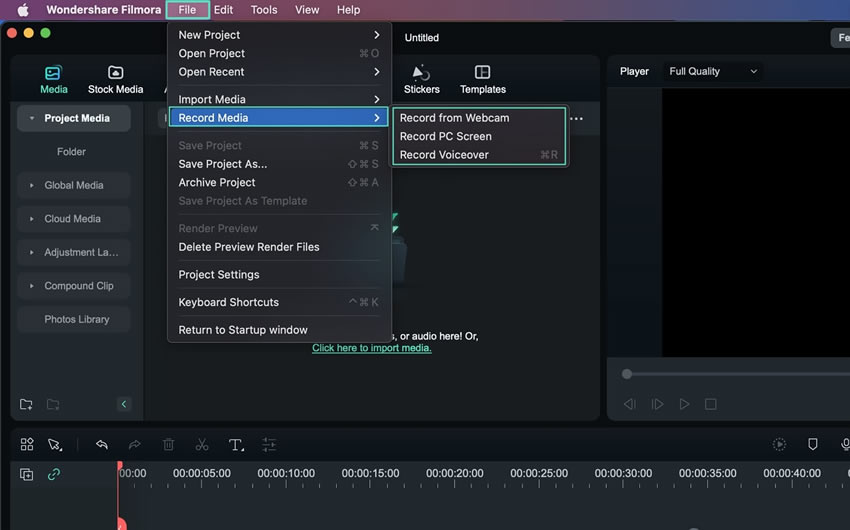
2. From the Top Toolbar
Enter Filmora and navigate towards the “Files“ > “Record Media“. You will see 3 options for recording.

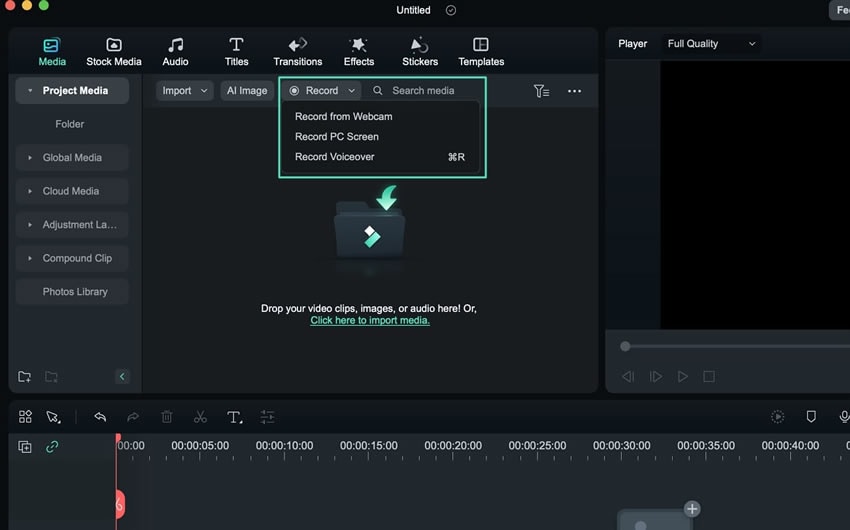
3. From the Search Bar Menu
Enter Filmora then find the search bar, the “Record“ option just next to it. Select a suitable recording option.
Make Screen Record and Snapshot on Mac

WPS Office Premium ( File Recovery, Photo Scanning, Convert PDF)–Yearly
Secure Download
Make Screen Record and Snapshot on Mac
Secure Download


Key features:
• Import from any devices and cams, including GoPro and drones. All formats supported. Сurrently the only free video editor that allows users to export in a new H265/HEVC codec, something essential for those working with 4K and HD.
• Everything for hassle-free basic editing: cut, crop and merge files, add titles and favorite music
• Visual effects, advanced color correction and trendy Instagram-like filters
• All multimedia processing done from one app: video editing capabilities reinforced by a video converter, a screen capture, a video capture, a disc burner and a YouTube uploader
• Non-linear editing: edit several files with simultaneously
• Easy export to social networks: special profiles for YouTube, Facebook, Vimeo, Twitter and Instagram
• High quality export – no conversion quality loss, double export speed even of HD files due to hardware acceleration
• Stabilization tool will turn shaky or jittery footage into a more stable video automatically.
• Essential toolset for professional video editing: blending modes, Mask tool, advanced multiple-color Chroma Key
Step 2: After selecting the screen recorder option, customize the recording settings you like, then click the “Red“ button to start screen recording on Mac.

Step 3: Drag and drop the recording video clip to the timeline, you can now preview the video and click the “Snapshot“ icon to screenshot the screen, or use the shortcut key “Control + Option + S“ to capture a screenshot directly.

Then you can make simple settings and get your screenshots.

Want to Make Screen Record on Mac? Try This Out!
Filmora Screen Recorder helps to record games, videos, lectures, and webcams with original visual quality on Mac. Furthermore, you can re-edit the recording video clips with various AI features.
Screen Record on Mac with Ease Screen Record on Mac with Ease Learn More >

Screen Record on iPad with Ease Learn More >
 vMix Pro - Software based live production. vMix Pro includes everything in vMix 4K plus 8 channels of Replay and 8 vMix Call
Part 2: 4 Methods to Capture Screenshots on Mac Itself
Besides using a screenshot tool, Mac also offers multiple ways to make screenshots on a Mac PC or Macbook. Keep reading to find out the 4 ways!
- Method 1: 3 Ways to Take Screenshots with Mac’s Keyboard Commands
- Method 2: Taking Screenshots with Touch Bar on MacBook Pro
- Method 3: Capture Screen with Built-in Preview App in Mac
- Method 4: Make Screenshots with Pre-installed Grab App
Method 1 3 Ways to Take Screenshots with Keyboard Commands
Mac offers 3 keyborad commands to capture the entire screen, specific screen area and window. Read on.
Way 1: How to Capture an Entire Screen on a Mac?
Make sure that everything you want to include in the picture is clearly visible on the screen and simply hold the Command + Shift + 3 keyboard buttons to create the screenshot.

Way 2: How to Screenshot a Portion of the Screen on a Mac?
If you want to take screenshot on a partial part of the screen, simply hit the Command + Shift + 4 keys. Then drag the crosshair mouse cursor to the area you want to capture.
 Screensaver Factory, Create stunning professional screensavers within minutes. Create screensavers for yourself, for marketing or unlimited royalty-free commercial distribution. Make screensavers from images, video and swf flash, add background music and smooth sprite and transition effects. Screensaver Factory is very easy to use, and it enables you to make self-installing screensaver files and CDs for easy setup and distribution. Screensaver Factory is the most advanced software of its kind.
The crosshair will also display the pixel count to show you the size of the screenshot. Holding the Shift button will allow you to lock all corners of the selection rectangle, except the one you are dragging.
Way 3: How to Take Screenshots of a Specific App Window?
Launch the app or open the window you’d like to screenshot, and then hold the Command + Shift + 4 keys on your keyboard. Press the SPACE key to select the window, as the selected area turns blue, press the left-click of your mouse or hit the Enter button to snap a screenshot.

Method 2 Taking Screenshots with Touch Bar on MacBook Pro
MacBook Pro owners can utilize the Touch Bar feature to take screenshots on their computers. Click on the Apple logo from the menu bar, then select the System Preferences option. Click on the Keyboard > Customize Control Strip feature, located at the bottom of the screen. Once the new window pops-out you should locate the Screenshot icon and drag and drop it to the Touch Bar, and click Done.
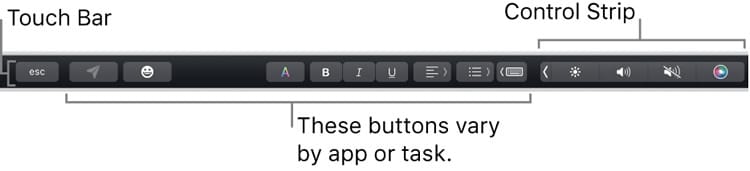Now that the Screenshot option is available from the Touch Bar, you can simply click on its icon and take screenshots of the full screen, a portion of it, or a single window.
Method 3 Capture Screen with Built-in Preview App
Open the Preview app, go to File and find the Take Screenshot sub-menu. You can either capture a full screen, a part of it you select or take a screenshot of an active window. Holding the Control button while taking a screenshot will enable you to save the picture to the clipboard and paste it into a photo editing software or a word processor.

The Preview app lets you select the saving path and name it before saving.
Method 4 Make Screenshots with Pre-installed Grab App
Go to Utility > Applications to launch Grab. Click on the Capture menu and select the option that suits you best. You can take a screenshot of an entire screen, select the region of the screen you want to capture or take a screenshot of a particular window.

The Timed Screen feature can be used if you want to have a ten-second delay before you take the screenshot, which can be quite useful if you need time to organize the desktop before the screenshot is taken.

If you would like to include the mouse cursor in your screenshots, you have go to the Preferences option, then select the Pointer Type, it also able to record the clicking sound if needed.
Conclusion
Mac provides the screenshots itself, also, some built-in apps are available to make screenshots in different cases. However, if you need an all-in-one screenshot and screen recorder program, try Filmora Screen Recorder , it will make it easy to solve your problem.
Secure Download
Secure Download
Max Wales
Max Wales is a writer and a lover of all things video.
Follow @Max Wales
Max Wales
Apr 18, 2024• Proven solutions
Unlike Windows PC, Mac computer doesn’t own the “PrintScreen” shortcut button to 1-click screenshot of the screen. However, we find the other way to take snapshots or screen records on Mac. Besides, if you want to know the shortcut keyboard command on Mac, just keep reading.
- Part 1: How to Make Screen Record and Screenshots on Mac - Edit After Screenshots
- Part 2: 4 Methods to Capture Screenshots on Mac Itself
Part 1: How to Make Screen Record and Screenshots on Mac
Here, we would like to recommend a tool for making screenshots and screen recordings at the same time. Filmora Screen Recorder can easily capture and record the operation on a Mac. Below are the 3 ways to start the function. Now download and install Filmora on Mac first, then keep reading.
Easy to Make Screenshots on Mac
Secure Download
Easy to Make Screenshots on Mac
Secure Download
 Simple and intuitive video editing
Supported System: macOS V14 (Sonoma), macOS V13 (Ventura), macOS V12 (Monterey), macOS v11 (Big Sur), macOS v10.15 (Catalina).
Step 1: Here are the entrance you can find on Filmora to launch the Screen Recorder function:
1. From the Start Interface
While you launch Filmora, you will see “Screen Recorder“ tab directly. Just click on it.
2. From the Top Toolbar
Enter Filmora and navigate towards the “Files“ > “Record Media“. You will see 3 options for recording.
3. From the Search Bar Menu
Enter Filmora then find the search bar, the “Record“ option just next to it. Select a suitable recording option.
Make Screen Record and Snapshot on Mac
Secure Download
Make Screen Record and Snapshot on Mac
Secure Download

Step 2: After selecting the screen recorder option, customize the recording settings you like, then click the “Red“ button to start screen recording on Mac.
Step 3: Drag and drop the recording video clip to the timeline, you can now preview the video and click the “Snapshot“ icon to screenshot the screen, or use the shortcut key “Control + Option + S“ to capture a screenshot directly.
Then you can make simple settings and get your screenshots.
Want to Make Screen Record on Mac? Try This Out!
Filmora Screen Recorder helps to record games, videos, lectures, and webcams with original visual quality on Mac. Furthermore, you can re-edit the recording video clips with various AI features.
Screen Record on Mac with Ease Screen Record on Mac with Ease Learn More >
Screen Record on iPad with Ease Learn More >

Part 2: 4 Methods to Capture Screenshots on Mac Itself
Besides using a screenshot tool, Mac also offers multiple ways to make screenshots on a Mac PC or Macbook. Keep reading to find out the 4 ways!
- Method 1: 3 Ways to Take Screenshots with Mac’s Keyboard Commands
- Method 2: Taking Screenshots with Touch Bar on MacBook Pro
- Method 3: Capture Screen with Built-in Preview App in Mac
- Method 4: Make Screenshots with Pre-installed Grab App
Method 1 3 Ways to Take Screenshots with Keyboard Commands
Mac offers 3 keyborad commands to capture the entire screen, specific screen area and window. Read on.
Way 1: How to Capture an Entire Screen on a Mac?
Make sure that everything you want to include in the picture is clearly visible on the screen and simply hold the Command + Shift + 3 keyboard buttons to create the screenshot.
Way 2: How to Screenshot a Portion of the Screen on a Mac?
If you want to take screenshot on a partial part of the screen, simply hit the Command + Shift + 4 keys. Then drag the crosshair mouse cursor to the area you want to capture.
The crosshair will also display the pixel count to show you the size of the screenshot. Holding the Shift button will allow you to lock all corners of the selection rectangle, except the one you are dragging.
Way 3: How to Take Screenshots of a Specific App Window?
Launch the app or open the window you’d like to screenshot, and then hold the Command + Shift + 4 keys on your keyboard. Press the SPACE key to select the window, as the selected area turns blue, press the left-click of your mouse or hit the Enter button to snap a screenshot.
Method 2 Taking Screenshots with Touch Bar on MacBook Pro
MacBook Pro owners can utilize the Touch Bar feature to take screenshots on their computers. Click on the Apple logo from the menu bar, then select the System Preferences option. Click on the Keyboard > Customize Control Strip feature, located at the bottom of the screen. Once the new window pops-out you should locate the Screenshot icon and drag and drop it to the Touch Bar, and click Done.

Now that the Screenshot option is available from the Touch Bar, you can simply click on its icon and take screenshots of the full screen, a portion of it, or a single window.
Method 3 Capture Screen with Built-in Preview App
Open the Preview app, go to File and find the Take Screenshot sub-menu. You can either capture a full screen, a part of it you select or take a screenshot of an active window. Holding the Control button while taking a screenshot will enable you to save the picture to the clipboard and paste it into a photo editing software or a word processor.
The Preview app lets you select the saving path and name it before saving.
Method 4 Make Screenshots with Pre-installed Grab App
Go to Utility > Applications to launch Grab. Click on the Capture menu and select the option that suits you best. You can take a screenshot of an entire screen, select the region of the screen you want to capture or take a screenshot of a particular window.
The Timed Screen feature can be used if you want to have a ten-second delay before you take the screenshot, which can be quite useful if you need time to organize the desktop before the screenshot is taken.

If you would like to include the mouse cursor in your screenshots, you have go to the Preferences option, then select the Pointer Type, it also able to record the clicking sound if needed.
Conclusion
Mac provides the screenshots itself, also, some built-in apps are available to make screenshots in different cases. However, if you need an all-in-one screenshot and screen recorder program, try Filmora Screen Recorder , it will make it easy to solve your problem.
Secure Download
Secure Download
Max Wales
Max Wales is a writer and a lover of all things video.
Follow @Max Wales
Max Wales
Apr 18, 2024• Proven solutions
Unlike Windows PC, Mac computer doesn’t own the “PrintScreen” shortcut button to 1-click screenshot of the screen. However, we find the other way to take snapshots or screen records on Mac. Besides, if you want to know the shortcut keyboard command on Mac, just keep reading.
- Part 1: How to Make Screen Record and Screenshots on Mac - Edit After Screenshots
- Part 2: 4 Methods to Capture Screenshots on Mac Itself
Part 1: How to Make Screen Record and Screenshots on Mac
Here, we would like to recommend a tool for making screenshots and screen recordings at the same time. Filmora Screen Recorder can easily capture and record the operation on a Mac. Below are the 3 ways to start the function. Now download and install Filmora on Mac first, then keep reading.
Easy to Make Screenshots on Mac
Secure Download
Easy to Make Screenshots on Mac
Secure Download
Supported System: macOS V14 (Sonoma), macOS V13 (Ventura), macOS V12 (Monterey), macOS v11 (Big Sur), macOS v10.15 (Catalina).
Step 1: Here are the entrance you can find on Filmora to launch the Screen Recorder function:
1. From the Start Interface
While you launch Filmora, you will see “Screen Recorder“ tab directly. Just click on it.
2. From the Top Toolbar
Enter Filmora and navigate towards the “Files“ > “Record Media“. You will see 3 options for recording.
3. From the Search Bar Menu
Enter Filmora then find the search bar, the “Record“ option just next to it. Select a suitable recording option.
Make Screen Record and Snapshot on Mac
Secure Download
Make Screen Record and Snapshot on Mac
Secure Download
Step 2: After selecting the screen recorder option, customize the recording settings you like, then click the “Red“ button to start screen recording on Mac.

Step 3: Drag and drop the recording video clip to the timeline, you can now preview the video and click the “Snapshot“ icon to screenshot the screen, or use the shortcut key “Control + Option + S“ to capture a screenshot directly.
Then you can make simple settings and get your screenshots.
Want to Make Screen Record on Mac? Try This Out!
Filmora Screen Recorder helps to record games, videos, lectures, and webcams with original visual quality on Mac. Furthermore, you can re-edit the recording video clips with various AI features.
Screen Record on Mac with Ease Screen Record on Mac with Ease Learn More >
Screen Record on iPad with Ease Learn More >
Part 2: 4 Methods to Capture Screenshots on Mac Itself
Besides using a screenshot tool, Mac also offers multiple ways to make screenshots on a Mac PC or Macbook. Keep reading to find out the 4 ways!
- Method 1: 3 Ways to Take Screenshots with Mac’s Keyboard Commands
- Method 2: Taking Screenshots with Touch Bar on MacBook Pro
- Method 3: Capture Screen with Built-in Preview App in Mac
- Method 4: Make Screenshots with Pre-installed Grab App
Method 1 3 Ways to Take Screenshots with Keyboard Commands
Mac offers 3 keyborad commands to capture the entire screen, specific screen area and window. Read on.
Way 1: How to Capture an Entire Screen on a Mac?
Make sure that everything you want to include in the picture is clearly visible on the screen and simply hold the Command + Shift + 3 keyboard buttons to create the screenshot.
Way 2: How to Screenshot a Portion of the Screen on a Mac?
If you want to take screenshot on a partial part of the screen, simply hit the Command + Shift + 4 keys. Then drag the crosshair mouse cursor to the area you want to capture.
The crosshair will also display the pixel count to show you the size of the screenshot. Holding the Shift button will allow you to lock all corners of the selection rectangle, except the one you are dragging.
Way 3: How to Take Screenshots of a Specific App Window?
Launch the app or open the window you’d like to screenshot, and then hold the Command + Shift + 4 keys on your keyboard. Press the SPACE key to select the window, as the selected area turns blue, press the left-click of your mouse or hit the Enter button to snap a screenshot.
 With Screensaver Wonder you can easily make a screensaver from your own pictures and video files. Create screensavers for your own computer or create standalone, self-installing screensavers for easy sharing with your friends. Together with its sister product Screensaver Factory, Screensaver Wonder is one of the most popular screensaver software products in the world, helping thousands of users decorate their computer screens quickly and easily.
Method 2 Taking Screenshots with Touch Bar on MacBook Pro
MacBook Pro owners can utilize the Touch Bar feature to take screenshots on their computers. Click on the Apple logo from the menu bar, then select the System Preferences option. Click on the Keyboard > Customize Control Strip feature, located at the bottom of the screen. Once the new window pops-out you should locate the Screenshot icon and drag and drop it to the Touch Bar, and click Done.
Now that the Screenshot option is available from the Touch Bar, you can simply click on its icon and take screenshots of the full screen, a portion of it, or a single window.
Method 3 Capture Screen with Built-in Preview App
Open the Preview app, go to File and find the Take Screenshot sub-menu. You can either capture a full screen, a part of it you select or take a screenshot of an active window. Holding the Control button while taking a screenshot will enable you to save the picture to the clipboard and paste it into a photo editing software or a word processor.
The Preview app lets you select the saving path and name it before saving.
Method 4 Make Screenshots with Pre-installed Grab App
Go to Utility > Applications to launch Grab. Click on the Capture menu and select the option that suits you best. You can take a screenshot of an entire screen, select the region of the screen you want to capture or take a screenshot of a particular window.
The Timed Screen feature can be used if you want to have a ten-second delay before you take the screenshot, which can be quite useful if you need time to organize the desktop before the screenshot is taken.
If you would like to include the mouse cursor in your screenshots, you have go to the Preferences option, then select the Pointer Type, it also able to record the clicking sound if needed.
Conclusion
Mac provides the screenshots itself, also, some built-in apps are available to make screenshots in different cases. However, if you need an all-in-one screenshot and screen recorder program, try Filmora Screen Recorder , it will make it easy to solve your problem.
Secure Download

Secure Download
Max Wales
Max Wales is a writer and a lover of all things video.
Follow @Max Wales
Max Wales
Apr 18, 2024• Proven solutions
Unlike Windows PC, Mac computer doesn’t own the “PrintScreen” shortcut button to 1-click screenshot of the screen. However, we find the other way to take snapshots or screen records on Mac. Besides, if you want to know the shortcut keyboard command on Mac, just keep reading.
- Part 1: How to Make Screen Record and Screenshots on Mac - Edit After Screenshots
- Part 2: 4 Methods to Capture Screenshots on Mac Itself
Part 1: How to Make Screen Record and Screenshots on Mac
Here, we would like to recommend a tool for making screenshots and screen recordings at the same time. Filmora Screen Recorder can easily capture and record the operation on a Mac. Below are the 3 ways to start the function. Now download and install Filmora on Mac first, then keep reading.
Easy to Make Screenshots on Mac
Secure Download
Easy to Make Screenshots on Mac
Secure Download


Supported System: macOS V14 (Sonoma), macOS V13 (Ventura), macOS V12 (Monterey), macOS v11 (Big Sur), macOS v10.15 (Catalina).
Step 1: Here are the entrance you can find on Filmora to launch the Screen Recorder function:
1. From the Start Interface
While you launch Filmora, you will see “Screen Recorder“ tab directly. Just click on it.

2. From the Top Toolbar
Enter Filmora and navigate towards the “Files“ > “Record Media“. You will see 3 options for recording.
3. From the Search Bar Menu
Enter Filmora then find the search bar, the “Record“ option just next to it. Select a suitable recording option.
 Video Converter Factory Pro
Make Screen Record and Snapshot on Mac
Secure Download
Make Screen Record and Snapshot on Mac
Secure Download
 Jet Profiler for MySQL, Enterprise Version: Jet Profiler for MySQL is real-time query performance and diagnostics tool for the MySQL database server. Its detailed query information, graphical interface and ease of use makes this a great tool for finding performance bottlenecks in your MySQL databases.
Step 2: After selecting the screen recorder option, customize the recording settings you like, then click the “Red“ button to start screen recording on Mac.
Step 3: Drag and drop the recording video clip to the timeline, you can now preview the video and click the “Snapshot“ icon to screenshot the screen, or use the shortcut key “Control + Option + S“ to capture a screenshot directly.
Then you can make simple settings and get your screenshots.
Want to Make Screen Record on Mac? Try This Out!
Filmora Screen Recorder helps to record games, videos, lectures, and webcams with original visual quality on Mac. Furthermore, you can re-edit the recording video clips with various AI features.
Screen Record on Mac with Ease Screen Record on Mac with Ease Learn More >
Screen Record on iPad with Ease Learn More >
Part 2: 4 Methods to Capture Screenshots on Mac Itself
Besides using a screenshot tool, Mac also offers multiple ways to make screenshots on a Mac PC or Macbook. Keep reading to find out the 4 ways!
- Method 1: 3 Ways to Take Screenshots with Mac’s Keyboard Commands
- Method 2: Taking Screenshots with Touch Bar on MacBook Pro
- Method 3: Capture Screen with Built-in Preview App in Mac
- Method 4: Make Screenshots with Pre-installed Grab App
 TubeDigger - online video downloader from mostly any site
Method 1 3 Ways to Take Screenshots with Keyboard Commands
Mac offers 3 keyborad commands to capture the entire screen, specific screen area and window. Read on.
Way 1: How to Capture an Entire Screen on a Mac?
Make sure that everything you want to include in the picture is clearly visible on the screen and simply hold the Command + Shift + 3 keyboard buttons to create the screenshot.
Way 2: How to Screenshot a Portion of the Screen on a Mac?
If you want to take screenshot on a partial part of the screen, simply hit the Command + Shift + 4 keys. Then drag the crosshair mouse cursor to the area you want to capture.
The crosshair will also display the pixel count to show you the size of the screenshot. Holding the Shift button will allow you to lock all corners of the selection rectangle, except the one you are dragging.
Way 3: How to Take Screenshots of a Specific App Window?
Launch the app or open the window you’d like to screenshot, and then hold the Command + Shift + 4 keys on your keyboard. Press the SPACE key to select the window, as the selected area turns blue, press the left-click of your mouse or hit the Enter button to snap a screenshot.
Method 2 Taking Screenshots with Touch Bar on MacBook Pro
MacBook Pro owners can utilize the Touch Bar feature to take screenshots on their computers. Click on the Apple logo from the menu bar, then select the System Preferences option. Click on the Keyboard > Customize Control Strip feature, located at the bottom of the screen. Once the new window pops-out you should locate the Screenshot icon and drag and drop it to the Touch Bar, and click Done.
Now that the Screenshot option is available from the Touch Bar, you can simply click on its icon and take screenshots of the full screen, a portion of it, or a single window.
Method 3 Capture Screen with Built-in Preview App
Open the Preview app, go to File and find the Take Screenshot sub-menu. You can either capture a full screen, a part of it you select or take a screenshot of an active window. Holding the Control button while taking a screenshot will enable you to save the picture to the clipboard and paste it into a photo editing software or a word processor.

The Preview app lets you select the saving path and name it before saving.
Method 4 Make Screenshots with Pre-installed Grab App
Go to Utility > Applications to launch Grab. Click on the Capture menu and select the option that suits you best. You can take a screenshot of an entire screen, select the region of the screen you want to capture or take a screenshot of a particular window.

The Timed Screen feature can be used if you want to have a ten-second delay before you take the screenshot, which can be quite useful if you need time to organize the desktop before the screenshot is taken.
If you would like to include the mouse cursor in your screenshots, you have go to the Preferences option, then select the Pointer Type, it also able to record the clicking sound if needed.
Conclusion
Mac provides the screenshots itself, also, some built-in apps are available to make screenshots in different cases. However, if you need an all-in-one screenshot and screen recorder program, try Filmora Screen Recorder , it will make it easy to solve your problem.
Secure Download
Secure Download

Max Wales
Max Wales is a writer and a lover of all things video.
Follow @Max Wales
- Title: [Updated] Innovative Mac Image Recording The Top 5 Cutting-Edge Techniques for 2024
- Author: Emma
- Created at : 2024-07-24 08:57:52
- Updated at : 2024-07-25 08:57:52
- Link: https://on-screen-recording.techidaily.com/updated-innovative-mac-image-recording-the-top-5-cutting-edge-techniques-for-2024/
- License: This work is licensed under CC BY-NC-SA 4.0.