![[Updated] Screen Recording Made Simple 5 Essential Strategies for Minecraft (Mac)](https://thmb.techidaily.com/9420d8c67dc649498f45244e433ec706e66933c2bf2f2b4b3c5585601cba7b98.jpg)
"[Updated] Screen Recording Made Simple 5 Essential Strategies for Minecraft (Mac)"
Screen Recording Made Simple: 5 Essential Strategies for Minecraft (Mac)
Recently, online gaming has been very popular due to the rise in internet technology and one such famous game is Minecraft. The application was published online to inspire the gamers to build their creations and share them with the gaming community. And with time, there have been major upgrades and updates seen in the game and now, the game has over a billion users who play Minecraft regularly.
With the addition of new worlds in Minecraft, a lot of people are sharing their created achievements and tutorials on different platforms. And to do that, the user must need to record the game on their PC. Also, if you are a macOS user, then you must be wondering how to record Minecraft on Mac. This article discusses some of the best applications that can be used to record Minecraft Mac while playing and saving the video to the PC.
Here’s a quick guide to “what is the best recording software for Minecraft Mac?”
Way 1. Record Minecraft with Filmora on Mac
One of the most famous applications and best minecraft recording software for Mac that is used for video editing and creating amazing content is the Filmora. It is available for Mac with a free trial version followed by a paid subscription service. Also, what makes it even more interesting is the fact that you can also record the screen with the highest quality audio and video with Filmora on your PC. The process for recording the screen is very simple and effortless and if you want to record your Minecraft gameplay on your Mac with Filmora, then you can follow these steps:
For Win 7 or later (64-bit)
For macOS 10.12 or later
- First, you will need to download the Filmora application from its official website by visiting the download page in your web browser. Then after you are done with the download process, you can install it on your Mac.
- Then after the application is installed, open it on your Mac device and then allow the permissions it is asking for file access and microphone access.
- Then there you will see an option that says “Record”. Click on that and you will be available with three options on a drop-down menu. Those will be for a screen record, capturing a webcam video, or performing a voiceover. Select the “Screen record” option from there.
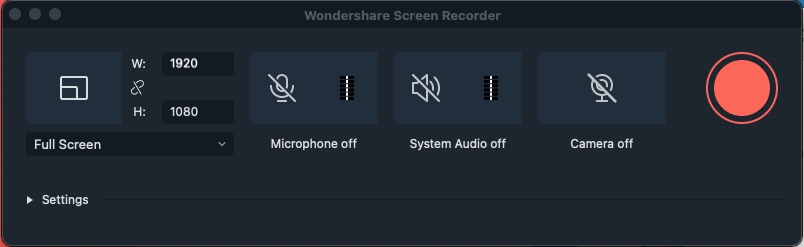
- This will enable the floating menu consisting of the start, pause and stop buttons from the default WonderShare screen recorder.
- Click on the start button and then go to Minecraft to play the game. When you are done with your screen recording, click on the “STOP” button on the overlay and the screen recorded video will be saved to your computer files.
Way 2. Use QuickTime player
The second application on the list and minecraft screen recorder Mac free is QuickTime player and most apple users probably know about this. This is the default media player available for Mac users and usually comes preinstalled on all the Apple computers and laptops. What makes it more interesting is that it is not only a media player but can also perform screen recording in real-time. The application has a very minimalist user interface and it offers screen recording in different settings. You can record Minecraft with QuickTime Player on your Mac device by following these steps:
- First, check whether your device has a pre-installed QuickTime installed in it. Generally, you can search the QuickTime application in the search bar of your Mac, and if it’s available then click on the icon. If it’s not, then visit Apple’s official website and you will find the download page for the QuickTime player from there. Then download it and install it on your device.
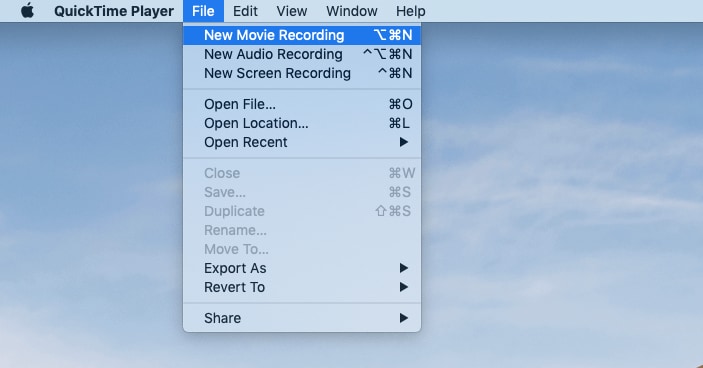
- After opening QuickTime player on any Mac, the user will be available with a bunch of tools and options such as “Files”, “view”, “edit” tabs, etc. From there you will need to select the “Files” option and click on it. When you open this, a dropdown menu will appear on your screen which will have several items shown in it.
- From the dropdown menu select “New Movie Recording” and the application will start the screen recording with a timer of 3 seconds. Now go to Minecraft and play the game as per your wish. Then when you are done with recording Minecraft, click on the stop button available as an overlay on your screen and the game will be saved to your device.
Way 3. Use OBS Studio
OBS studio is believed to be a powerhouse for content creators especially because of its editing and video creation options. And in macOS, the process of creating different videos becomes more flawless. If you are a Minecraft gamer and you want to record your gaming sessions with any screen recorder, then OBS studio would be the best option for you. It has features for recording the screen in different resolutions and you can trim and cut the clip after your recording session too.
The premium version of this application also provides different audio editing enhanced features and the process to record Minecraft with OBS Studio is as follows:
- First, download and install OBS Studio on your PC and open it. By default, a scene will be created in the interface of the application. If it’s not present then you can add a scene by clicking on the plus sign right next to the “Scenes” option. This option should be present on the left corner of your screen.
- Then, scroll down to the option that says “Sources”. The sources option will be generally on the bottom panel of the interface you are using.
- Here you will see an array of tiny buttons from which you will need to click the small plus button and it will let you access the options panel.
- In the options panel select the option that says “Display Capture” and if you are getting a small popup on your screen, then click “Ok”.
- Now, click on the bottom right corner of the screen and select the “Settings” option from there. Then select the “output” option from the available options.
- Then in the “recording path” option present on your screen, you will need to select a destination folder for your output video.
- After you are done with these settings and configurations, click on the blue button that says “Start recording” and open Minecraft to record the gameplay.
- When you are done click on the stop icon available on your Mac device screen and the video will be saved in your storage.
Way 4. Record Minecraft with ScreenFlow
Another application that has been working constantly to upgrade the screen recording technology is the ScreenFlow application and it features some of the best screen recording features available out there. And if you are a Mac user, then you are available with a free trial version followed by a premium membership with paid service that will unlock other features such as editing and saving the screen recorded video in different formats.
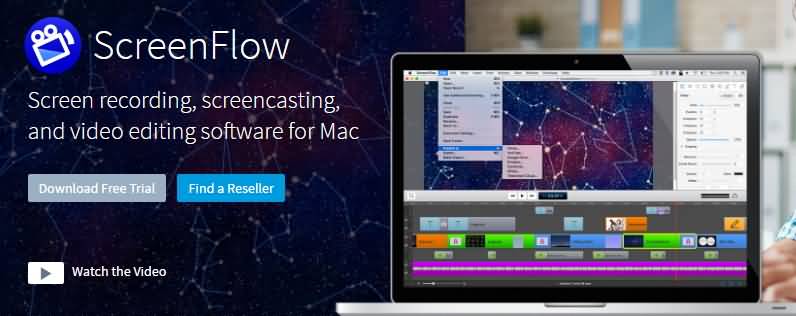
Also, if you wish to record your Minecraft gameplay sessions, then you will be able to do so in different quality and resolution too. Here is how you can record a Minecraft by using ScreenFlow:
- Download and install ScreenFlow to your PC and then launch it. You will see a black screen interface where there will be a bunch of options available on the top and sidebars.
- Click on the Settings icon available in the left corner and select output video quality according to your preference. If you are on a trial version then these options will be limited for you.
- After you configure your video characteristics, go to the top bar where you will see the option “Files”. Click on that and then select screen capture as the next option.
- Alternatively, you can also add the plus icon available on your screen to start a new project and under that select “create new video”. Then select “Screen Capture” and your screen recording will start.
- Now open the Minecraft application and play a session of the game. When you are done, click on the stop button from the ScreenFlow menu and the video will be stored in your Mac device storage instantly.
Way 5. Use VLC to Record Minecraft
VLC is known as one of the most useful and efficient video players that support tons of customization and screenplays. The key reasons for its popularity are the fact that it has a smart yet powerful user interface with simple command options to turn any multimedia experience into a worthy one. And with the recent updates, VLC can record the screen too. This means that you will be able to record your favorite Minecraft gameplay with VLC too and to do that you will need to follow these steps:

- First, open the VLC media player on your Mac and then select the “Media” option available on the top.
- Then select the option that says “open capture device” and in the dropdown menu on your screen, choose the desktop option.
- Then you will be asked to set the desired frame rate for your output video and then after configuring your preferred settings, click on “OK”.
- Now click on the start recording icon and then play your Minecraft session. After you are done click on the “STOP” icon and your video will be saved successfully.
Conclusion
Minecraft has been a popular game because of its different worlds and modes. There are over a billion players in this game and if you are one of them and you want to record your gaming sessions, then screen recording can help you do that. The article discussed some of the best screen recording applications available for macOS. These applications are versatile and have very powerful tools that can help you record Minecraft effortlessly and you can easily install them to start using them instantly.
For macOS 10.12 or later
- First, you will need to download the Filmora application from its official website by visiting the download page in your web browser. Then after you are done with the download process, you can install it on your Mac.
- Then after the application is installed, open it on your Mac device and then allow the permissions it is asking for file access and microphone access.
- Then there you will see an option that says “Record”. Click on that and you will be available with three options on a drop-down menu. Those will be for a screen record, capturing a webcam video, or performing a voiceover. Select the “Screen record” option from there.
- This will enable the floating menu consisting of the start, pause and stop buttons from the default WonderShare screen recorder.
- Click on the start button and then go to Minecraft to play the game. When you are done with your screen recording, click on the “STOP” button on the overlay and the screen recorded video will be saved to your computer files.
Way 2. Use QuickTime player
The second application on the list and minecraft screen recorder Mac free is QuickTime player and most apple users probably know about this. This is the default media player available for Mac users and usually comes preinstalled on all the Apple computers and laptops. What makes it more interesting is that it is not only a media player but can also perform screen recording in real-time. The application has a very minimalist user interface and it offers screen recording in different settings. You can record Minecraft with QuickTime Player on your Mac device by following these steps:
- First, check whether your device has a pre-installed QuickTime installed in it. Generally, you can search the QuickTime application in the search bar of your Mac, and if it’s available then click on the icon. If it’s not, then visit Apple’s official website and you will find the download page for the QuickTime player from there. Then download it and install it on your device.
- After opening QuickTime player on any Mac, the user will be available with a bunch of tools and options such as “Files”, “view”, “edit” tabs, etc. From there you will need to select the “Files” option and click on it. When you open this, a dropdown menu will appear on your screen which will have several items shown in it.
- From the dropdown menu select “New Movie Recording” and the application will start the screen recording with a timer of 3 seconds. Now go to Minecraft and play the game as per your wish. Then when you are done with recording Minecraft, click on the stop button available as an overlay on your screen and the game will be saved to your device.
Way 3. Use OBS Studio
OBS studio is believed to be a powerhouse for content creators especially because of its editing and video creation options. And in macOS, the process of creating different videos becomes more flawless. If you are a Minecraft gamer and you want to record your gaming sessions with any screen recorder, then OBS studio would be the best option for you. It has features for recording the screen in different resolutions and you can trim and cut the clip after your recording session too.
The premium version of this application also provides different audio editing enhanced features and the process to record Minecraft with OBS Studio is as follows:
- First, download and install OBS Studio on your PC and open it. By default, a scene will be created in the interface of the application. If it’s not present then you can add a scene by clicking on the plus sign right next to the “Scenes” option. This option should be present on the left corner of your screen.
- Then, scroll down to the option that says “Sources”. The sources option will be generally on the bottom panel of the interface you are using.
- Here you will see an array of tiny buttons from which you will need to click the small plus button and it will let you access the options panel.
- In the options panel select the option that says “Display Capture” and if you are getting a small popup on your screen, then click “Ok”.
- Now, click on the bottom right corner of the screen and select the “Settings” option from there. Then select the “output” option from the available options.
- Then in the “recording path” option present on your screen, you will need to select a destination folder for your output video.
- After you are done with these settings and configurations, click on the blue button that says “Start recording” and open Minecraft to record the gameplay.
- When you are done click on the stop icon available on your Mac device screen and the video will be saved in your storage.
Way 4. Record Minecraft with ScreenFlow
Another application that has been working constantly to upgrade the screen recording technology is the ScreenFlow application and it features some of the best screen recording features available out there. And if you are a Mac user, then you are available with a free trial version followed by a premium membership with paid service that will unlock other features such as editing and saving the screen recorded video in different formats.
Also, if you wish to record your Minecraft gameplay sessions, then you will be able to do so in different quality and resolution too. Here is how you can record a Minecraft by using ScreenFlow:
- Download and install ScreenFlow to your PC and then launch it. You will see a black screen interface where there will be a bunch of options available on the top and sidebars.
- Click on the Settings icon available in the left corner and select output video quality according to your preference. If you are on a trial version then these options will be limited for you.
- After you configure your video characteristics, go to the top bar where you will see the option “Files”. Click on that and then select screen capture as the next option.
- Alternatively, you can also add the plus icon available on your screen to start a new project and under that select “create new video”. Then select “Screen Capture” and your screen recording will start.
- Now open the Minecraft application and play a session of the game. When you are done, click on the stop button from the ScreenFlow menu and the video will be stored in your Mac device storage instantly.
Way 5. Use VLC to Record Minecraft
VLC is known as one of the most useful and efficient video players that support tons of customization and screenplays. The key reasons for its popularity are the fact that it has a smart yet powerful user interface with simple command options to turn any multimedia experience into a worthy one. And with the recent updates, VLC can record the screen too. This means that you will be able to record your favorite Minecraft gameplay with VLC too and to do that you will need to follow these steps:
- First, open the VLC media player on your Mac and then select the “Media” option available on the top.
- Then select the option that says “open capture device” and in the dropdown menu on your screen, choose the desktop option.
- Then you will be asked to set the desired frame rate for your output video and then after configuring your preferred settings, click on “OK”.
- Now click on the start recording icon and then play your Minecraft session. After you are done click on the “STOP” icon and your video will be saved successfully.
Conclusion
Minecraft has been a popular game because of its different worlds and modes. There are over a billion players in this game and if you are one of them and you want to record your gaming sessions, then screen recording can help you do that. The article discussed some of the best screen recording applications available for macOS. These applications are versatile and have very powerful tools that can help you record Minecraft effortlessly and you can easily install them to start using them instantly.
Also read:
- [New] 2024 Approved A Guide to the Finest Apps for Instagram Reel Creation
- [New] 2024 Approved From Download to Implementation Installing OBS on a MacPC
- [New] Efficiency in Echoes Aural Recorded Images
- [New] In 2024, Exploring Screen Capture with Apowersoft, No Cost Involved!
- [New] In 2024, Mastering Mixer Streams on macOS A Step-by-Step Guide
- [New] Smartphone Entertainment at No Cost Our Top Picks of Live Streamers for 2024
- [Updated] 2024 Approved ScreenCapture Simplified An In-Depth CamStudio Review
- [Updated] Fixing Overencoded OBS Videos for 2024
- [Updated] In 2024, Mastering Video Backgrounds TeamMeeting Blurring Guide
- [Updated] Streamlining Image Editing Taking Out Backgrounds for 2024
- [Updated] Unlock Creative Potential Strategic Use of Strikethrough for 2024
- [Updated] Unraveling Zoom's Secrets Mastery of Screenshot Sharing for 2024
- 2024 Approved Virtual Reality Wonders Uncovering the Leading VR Gear
- Home Button Not Working on Xiaomi 14 Pro? Here Are Real Fixes | Dr.fone
- How to Fix Life360 Shows Wrong Location On Honor Magic 5 Lite? | Dr.fone
- In 2024, Digital Diaries Reviewing the Best Personal Devices
- In 2024, Unveiling Top-Tier Screen Capture Tech in ITop Review
- Top 5 Samsung Galaxy S23 Tactical Edition Bypass FRP Tools for PC That Actually Work
- Unveiling the Ultimate Lineup of LLM Innovations
- Title: [Updated] Screen Recording Made Simple 5 Essential Strategies for Minecraft (Mac)
- Author: Emma
- Created at : 2024-12-28 02:28:41
- Updated at : 2024-12-29 01:08:18
- Link: https://on-screen-recording.techidaily.com/updated-screen-recording-made-simple-5-essential-strategies-for-minecraft-mac/
- License: This work is licensed under CC BY-NC-SA 4.0.