![[Updated] Streamlined Techniques for Efficient Apple Screenshots](https://thmb.techidaily.com/a6603b4c8e64882a75258ea91034b33184d3edc319264524a7b728bfe67ef7f7.jpg)
[Updated] Streamlined Techniques for Efficient Apple Screenshots
Streamlined Techniques for Efficient Apple Screenshots
Since the invention of Linux-based systems, its popularity is growing in substantial numbers. Whether it’s an engineer, graphical designer, or programmer, he will prefer Linux-based operating systems and computers. Therefore, Macbook Air computers since 2008 are commonly used by information technology geeks. Nowadays, this trend has not been limited to its professional users but everyone in our circle wants to buy a cool Macbook despite its use.
Well, in this scenario using the graphical GUI might seem easy but it’s not pretty basic to that of windows. Many of us want to capture our screen either for educational purposes or entertainment but doing that on Macbook might not be so simple. However, you don’t need to panic because we have got you all covered in this article. We will see how to screen record on MacBook Air using different techniques. So let’s begin one by one in the coming sections.
Part 1: Use Keyboard Shortcuts
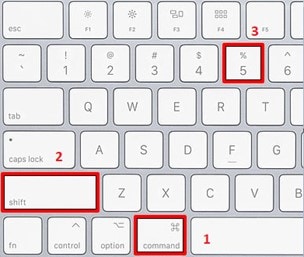
MacBook Air OS supports certain keyboard shortcuts to start screen recording and taking screenshots. You can either take a screenshot using the shortcut keys or record your screen by bringing in the tools on the screen To bring the screen recording tools menu on Mac, all you need is to press “Command + Shift + 4”.
After pressing you will be prompted to application windows as shown in the figure.

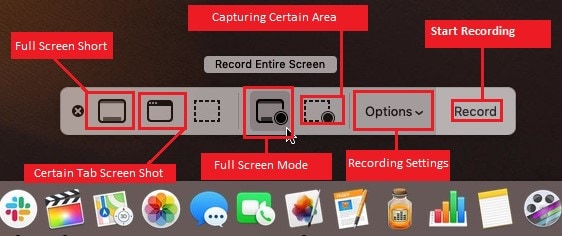
Once the application window appears, you must know what each icon on the window means. On the left side of the window, as you can see, you can manage the screenshot of your screen either in full or of some windows or areas. Next is the middle area, which gives you two modes for screen recording, fullscreen mode to record your screen or choose a certain area to record from the screen as shown above in the figure. You can access all the recording settings before pressing to record your screen.
**Recording Settings:
Before starting your screen recording it’s important to adjust for different recording settings as shown in the figure below. Just click the “options” in the main GUI of the recorder to show it up.
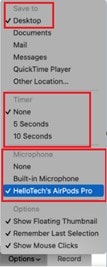
You can select your destination folder for saving your records using the “save to” bar in the settings. Set the timer up to 5 and 10 seconds if you short version video. You can also set to record both visual and audio from the screen using the microphone settings. In the end, you are left with other options of showing a floating thumbnail on your recording or keeping the last settings you have done here with the “Remember last selection option”. These are the options you can adjust before starting your screen record.
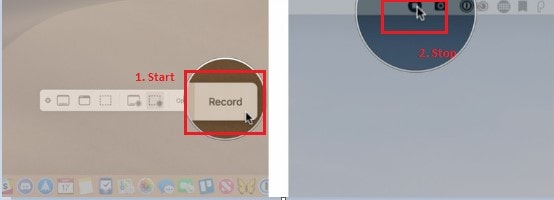
To stop recording all you have to do is press the small icon that appears in the top-right corner of your desktop screen. Visit your selected destination folder of the recording and bingo you can enjoy your screen recording.
**Other Shortcut Keys:
Other shortcut keys that can be used to take screenshots and screen recording let’s have a look at the following table.
| **Shortcut Key | **Function |
|---|---|
| Shift + Command + 3 | Take a Full Screenshot. |
| Shift + Command + 4 | Capturing a portion of the screen |
| Shift + Command + 4 + Spacebar | Take a screenshot of a certain window. |
| Shift + Command + 5 | Bring you the screenshot and screen recording tools |

Part 2: Use QuickTime Player
Another hidden application in your MacBook Air utility program that already comes built-in with Mac OS is QuickTime Player. With this player, you can easily record your screen and take screenshots along the system audio as well as microphone input. To access this application and utilize it for your purpose all you need is to follow the steps given in the coming section.
First, you will need to look into your applications row on your desktop screen. You will probably see the QuickTime player icon there. Right-click on the icon and start the new screen recorder to access the application. Or you can use the other method to access it with QuickTime open from the upper bar as shown in the figure below.
 vMix Pro - Software based live production. vMix Pro includes everything in vMix 4K plus 8 channels of Replay and 8 vMix Call
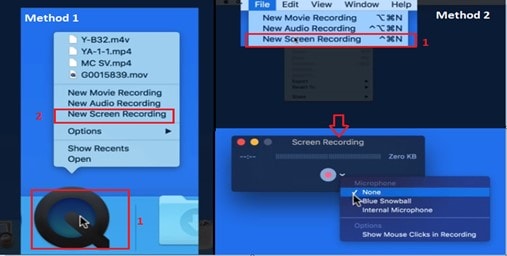
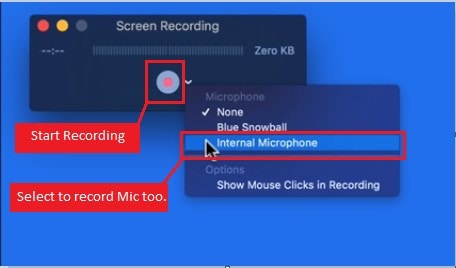
Once you are done with launching the GUI of the application, it’s time to learn how can you start recording now. Before starting your recording with the red icon of the start button as shown it is important to choose whether you want microphone input to be recorded or not. You can easily do it by enabling the internal microphone in the settings as shown in the figure. Once you are done with the settings it’s time to start your recording.
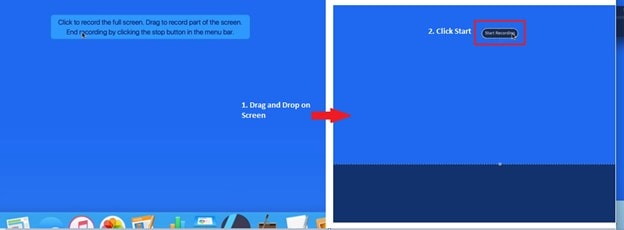
Click on the start recording button and you will see a new window will pop up to choose the screen recording mode from it as shown in the figure below. To record in the full-screen recording mode you just need to click randomly on the screen once and it will start recording the whole screen. Otherwise, drag and select a particular area on the screen and click start recording once shown and you will have the recording of the particular screen area.
 Project Manager - Asset Browser for 3Ds Max
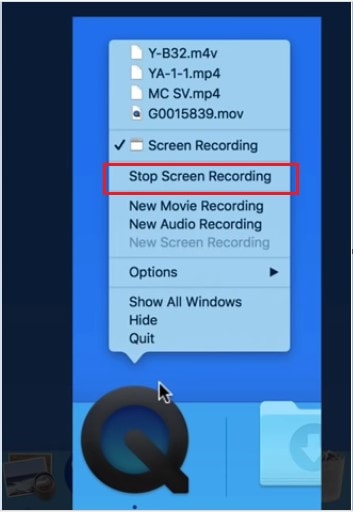
Finally, if you are needed to stop recording, all you have to do is click on the QuickTime player icon in the application bar and select stop recording as shown. After doing so, you will be left with the untitled video of your recording that you can play through the player.
Part 3: Use Filmora
Another cool way to record your screen on Macbook Air is using Filmora. Filmora comes with many updated versions, the latest one is Filmora 11. The good thing is, that this method is similar to all of its versions. We will be using Filmora 9 to show how you can use its screen recorder on your MacBook Air to screen record like a pro.
For Win 7 or later (64-bit)
For macOS 10.12 or later
First of all, you will need to have Filmora 9 on your Macbook Air. Assuming that you already got the Filmora on your MacBook, let’s move toward how can you launch it. Go to the main application bar on your Mac desktop and launch Filmora. You will see a window pop up asking you to create a new project. Just create a new project and bingo, its open.

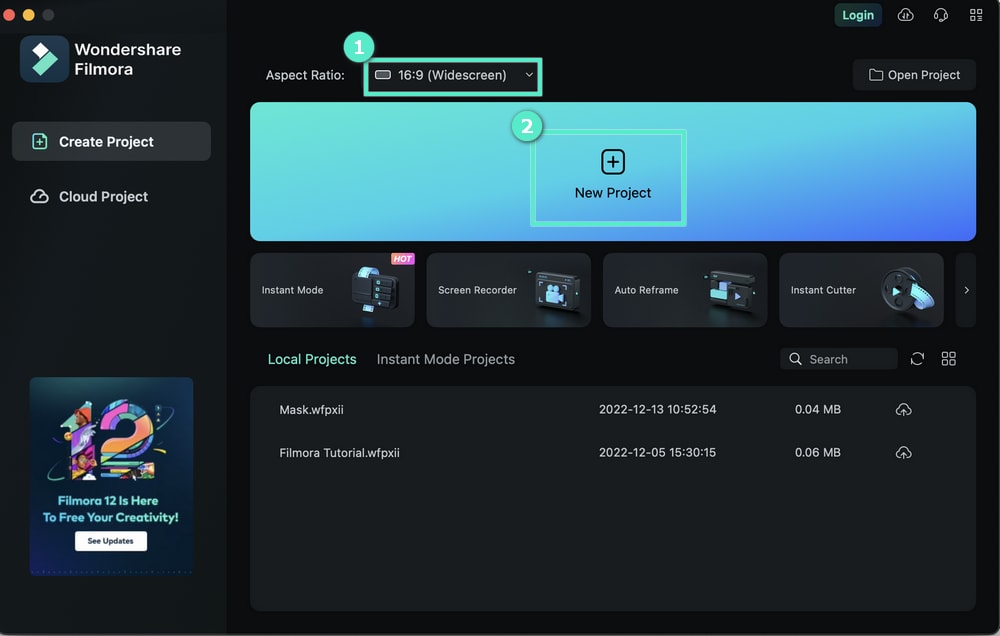
Inside the Filmora application, go to the file in the menu, then hover on the “record media” and then click on the “Record PC Screen”.
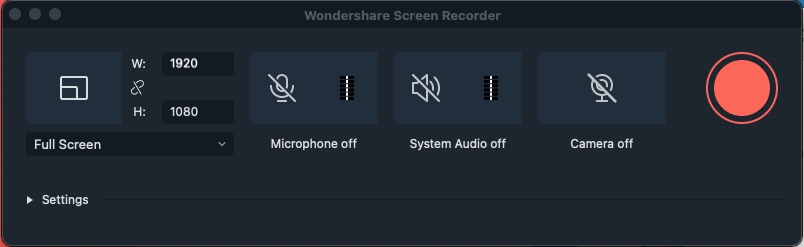
After following the above steps, you will see the Filmora recorder has been launched as shown. You can select different capturing modes for your screen recording using the “Full Screen” options. Moreover, the frame size of your capturing can also be adjusted using custom values for size. Choose microphone input for your video through mic settings and enable/disable system audio anytime in this window. The recording can be started with the circular icon on this window as shown in the figure.
Before starting your recording it’s important to have a look at the detailed recording settings. To access those settings just click on the settings icon on the GUI of the recorder as can be seen in the above picture. Once you have clicked on it, you will see a new window of settings as shown.

WPS Office Premium ( File Recovery, Photo Scanning, Convert PDF)–Yearly
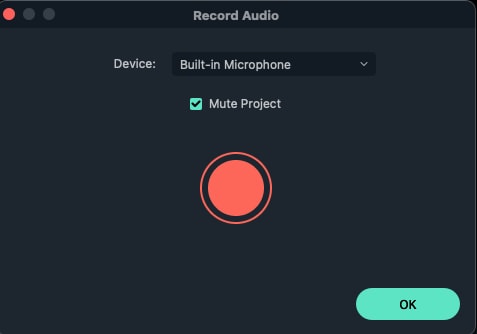
You can choose the destination folder for your recording from the “Save To” filed in the newly launched window. You can also set frame rates, and the quality of your video and start the recorder timer before starting recording. If you want to record the webcam footage or some other camera module attached to your PC too. All you need to check the Camera field and it will simultaneously record your camera feed too.
Soon as you start capturing your screen recording, you will a timer will start the countdown. Once it’s finished, your recording will be started. After some time you think, it’s time to finish recording then you don’t have to worry about that too. All you have to do is by clicking the small icon in the top-right icon bar of the desktop screen of your MacBook Air as shown in the picture below attached.
This is how you can record your screen with an amazing recorder that comes with the WonderShare Filmora application on your MacBook Air.

Conclusion
There may be other tools and screen recorders in the market available for your MacBook Air. But for the sake of carrying important information to all the users out there looking for information regarding screen recorders then we serve our purpose for them. Here in this article, the aim was to provide the simplest application and ways to record your screen with great ease. We started with pretty much basic screen recording shortcuts and basic applications to screen record your Mac. We greatly hope after reading this article it will be never a problem for you to screen record anytime using your MacBook Air.
Part 2: Use QuickTime Player
Another hidden application in your MacBook Air utility program that already comes built-in with Mac OS is QuickTime Player. With this player, you can easily record your screen and take screenshots along the system audio as well as microphone input. To access this application and utilize it for your purpose all you need is to follow the steps given in the coming section.
First, you will need to look into your applications row on your desktop screen. You will probably see the QuickTime player icon there. Right-click on the icon and start the new screen recorder to access the application. Or you can use the other method to access it with QuickTime open from the upper bar as shown in the figure below.
Once you are done with launching the GUI of the application, it’s time to learn how can you start recording now. Before starting your recording with the red icon of the start button as shown it is important to choose whether you want microphone input to be recorded or not. You can easily do it by enabling the internal microphone in the settings as shown in the figure. Once you are done with the settings it’s time to start your recording.
Click on the start recording button and you will see a new window will pop up to choose the screen recording mode from it as shown in the figure below. To record in the full-screen recording mode you just need to click randomly on the screen once and it will start recording the whole screen. Otherwise, drag and select a particular area on the screen and click start recording once shown and you will have the recording of the particular screen area.
Finally, if you are needed to stop recording, all you have to do is click on the QuickTime player icon in the application bar and select stop recording as shown. After doing so, you will be left with the untitled video of your recording that you can play through the player.

Part 3: Use Filmora
Another cool way to record your screen on Macbook Air is using Filmora. Filmora comes with many updated versions, the latest one is Filmora 11. The good thing is, that this method is similar to all of its versions. We will be using Filmora 9 to show how you can use its screen recorder on your MacBook Air to screen record like a pro.
For Win 7 or later (64-bit)
For macOS 10.12 or later
First of all, you will need to have Filmora 9 on your Macbook Air. Assuming that you already got the Filmora on your MacBook, let’s move toward how can you launch it. Go to the main application bar on your Mac desktop and launch Filmora. You will see a window pop up asking you to create a new project. Just create a new project and bingo, its open.
Inside the Filmora application, go to the file in the menu, then hover on the “record media” and then click on the “Record PC Screen”.
After following the above steps, you will see the Filmora recorder has been launched as shown. You can select different capturing modes for your screen recording using the “Full Screen” options. Moreover, the frame size of your capturing can also be adjusted using custom values for size. Choose microphone input for your video through mic settings and enable/disable system audio anytime in this window. The recording can be started with the circular icon on this window as shown in the figure.
Before starting your recording it’s important to have a look at the detailed recording settings. To access those settings just click on the settings icon on the GUI of the recorder as can be seen in the above picture. Once you have clicked on it, you will see a new window of settings as shown.
You can choose the destination folder for your recording from the “Save To” filed in the newly launched window. You can also set frame rates, and the quality of your video and start the recorder timer before starting recording. If you want to record the webcam footage or some other camera module attached to your PC too. All you need to check the Camera field and it will simultaneously record your camera feed too.
Soon as you start capturing your screen recording, you will a timer will start the countdown. Once it’s finished, your recording will be started. After some time you think, it’s time to finish recording then you don’t have to worry about that too. All you have to do is by clicking the small icon in the top-right icon bar of the desktop screen of your MacBook Air as shown in the picture below attached.
This is how you can record your screen with an amazing recorder that comes with the WonderShare Filmora application on your MacBook Air.
 DLNow Video Downloader
Conclusion
There may be other tools and screen recorders in the market available for your MacBook Air. But for the sake of carrying important information to all the users out there looking for information regarding screen recorders then we serve our purpose for them. Here in this article, the aim was to provide the simplest application and ways to record your screen with great ease. We started with pretty much basic screen recording shortcuts and basic applications to screen record your Mac. We greatly hope after reading this article it will be never a problem for you to screen record anytime using your MacBook Air.
Part 2: Use QuickTime Player
Another hidden application in your MacBook Air utility program that already comes built-in with Mac OS is QuickTime Player. With this player, you can easily record your screen and take screenshots along the system audio as well as microphone input. To access this application and utilize it for your purpose all you need is to follow the steps given in the coming section.
First, you will need to look into your applications row on your desktop screen. You will probably see the QuickTime player icon there. Right-click on the icon and start the new screen recorder to access the application. Or you can use the other method to access it with QuickTime open from the upper bar as shown in the figure below.
Once you are done with launching the GUI of the application, it’s time to learn how can you start recording now. Before starting your recording with the red icon of the start button as shown it is important to choose whether you want microphone input to be recorded or not. You can easily do it by enabling the internal microphone in the settings as shown in the figure. Once you are done with the settings it’s time to start your recording.
Click on the start recording button and you will see a new window will pop up to choose the screen recording mode from it as shown in the figure below. To record in the full-screen recording mode you just need to click randomly on the screen once and it will start recording the whole screen. Otherwise, drag and select a particular area on the screen and click start recording once shown and you will have the recording of the particular screen area.
 NeoDownloader - Fast and fully automatic image/video/music downloader.
Finally, if you are needed to stop recording, all you have to do is click on the QuickTime player icon in the application bar and select stop recording as shown. After doing so, you will be left with the untitled video of your recording that you can play through the player.
 HD Video Converter Factory Pro
Part 3: Use Filmora
Another cool way to record your screen on Macbook Air is using Filmora. Filmora comes with many updated versions, the latest one is Filmora 11. The good thing is, that this method is similar to all of its versions. We will be using Filmora 9 to show how you can use its screen recorder on your MacBook Air to screen record like a pro.
For Win 7 or later (64-bit)
For macOS 10.12 or later
First of all, you will need to have Filmora 9 on your Macbook Air. Assuming that you already got the Filmora on your MacBook, let’s move toward how can you launch it. Go to the main application bar on your Mac desktop and launch Filmora. You will see a window pop up asking you to create a new project. Just create a new project and bingo, its open.
Inside the Filmora application, go to the file in the menu, then hover on the “record media” and then click on the “Record PC Screen”.
After following the above steps, you will see the Filmora recorder has been launched as shown. You can select different capturing modes for your screen recording using the “Full Screen” options. Moreover, the frame size of your capturing can also be adjusted using custom values for size. Choose microphone input for your video through mic settings and enable/disable system audio anytime in this window. The recording can be started with the circular icon on this window as shown in the figure.
Before starting your recording it’s important to have a look at the detailed recording settings. To access those settings just click on the settings icon on the GUI of the recorder as can be seen in the above picture. Once you have clicked on it, you will see a new window of settings as shown.
You can choose the destination folder for your recording from the “Save To” filed in the newly launched window. You can also set frame rates, and the quality of your video and start the recorder timer before starting recording. If you want to record the webcam footage or some other camera module attached to your PC too. All you need to check the Camera field and it will simultaneously record your camera feed too.
Soon as you start capturing your screen recording, you will a timer will start the countdown. Once it’s finished, your recording will be started. After some time you think, it’s time to finish recording then you don’t have to worry about that too. All you have to do is by clicking the small icon in the top-right icon bar of the desktop screen of your MacBook Air as shown in the picture below attached.
This is how you can record your screen with an amazing recorder that comes with the WonderShare Filmora application on your MacBook Air.

Conclusion
There may be other tools and screen recorders in the market available for your MacBook Air. But for the sake of carrying important information to all the users out there looking for information regarding screen recorders then we serve our purpose for them. Here in this article, the aim was to provide the simplest application and ways to record your screen with great ease. We started with pretty much basic screen recording shortcuts and basic applications to screen record your Mac. We greatly hope after reading this article it will be never a problem for you to screen record anytime using your MacBook Air.
Part 2: Use QuickTime Player
Another hidden application in your MacBook Air utility program that already comes built-in with Mac OS is QuickTime Player. With this player, you can easily record your screen and take screenshots along the system audio as well as microphone input. To access this application and utilize it for your purpose all you need is to follow the steps given in the coming section.
First, you will need to look into your applications row on your desktop screen. You will probably see the QuickTime player icon there. Right-click on the icon and start the new screen recorder to access the application. Or you can use the other method to access it with QuickTime open from the upper bar as shown in the figure below.
Once you are done with launching the GUI of the application, it’s time to learn how can you start recording now. Before starting your recording with the red icon of the start button as shown it is important to choose whether you want microphone input to be recorded or not. You can easily do it by enabling the internal microphone in the settings as shown in the figure. Once you are done with the settings it’s time to start your recording.
Click on the start recording button and you will see a new window will pop up to choose the screen recording mode from it as shown in the figure below. To record in the full-screen recording mode you just need to click randomly on the screen once and it will start recording the whole screen. Otherwise, drag and select a particular area on the screen and click start recording once shown and you will have the recording of the particular screen area.
Finally, if you are needed to stop recording, all you have to do is click on the QuickTime player icon in the application bar and select stop recording as shown. After doing so, you will be left with the untitled video of your recording that you can play through the player.
 Glarysoft File Recovery Pro Annually - Helps to recover your lost file/data, even permanently deleted data.
Part 3: Use Filmora
Another cool way to record your screen on Macbook Air is using Filmora. Filmora comes with many updated versions, the latest one is Filmora 11. The good thing is, that this method is similar to all of its versions. We will be using Filmora 9 to show how you can use its screen recorder on your MacBook Air to screen record like a pro.
For Win 7 or later (64-bit)
For macOS 10.12 or later
First of all, you will need to have Filmora 9 on your Macbook Air. Assuming that you already got the Filmora on your MacBook, let’s move toward how can you launch it. Go to the main application bar on your Mac desktop and launch Filmora. You will see a window pop up asking you to create a new project. Just create a new project and bingo, its open.
Inside the Filmora application, go to the file in the menu, then hover on the “record media” and then click on the “Record PC Screen”.
After following the above steps, you will see the Filmora recorder has been launched as shown. You can select different capturing modes for your screen recording using the “Full Screen” options. Moreover, the frame size of your capturing can also be adjusted using custom values for size. Choose microphone input for your video through mic settings and enable/disable system audio anytime in this window. The recording can be started with the circular icon on this window as shown in the figure.
Before starting your recording it’s important to have a look at the detailed recording settings. To access those settings just click on the settings icon on the GUI of the recorder as can be seen in the above picture. Once you have clicked on it, you will see a new window of settings as shown.
You can choose the destination folder for your recording from the “Save To” filed in the newly launched window. You can also set frame rates, and the quality of your video and start the recorder timer before starting recording. If you want to record the webcam footage or some other camera module attached to your PC too. All you need to check the Camera field and it will simultaneously record your camera feed too.
Soon as you start capturing your screen recording, you will a timer will start the countdown. Once it’s finished, your recording will be started. After some time you think, it’s time to finish recording then you don’t have to worry about that too. All you have to do is by clicking the small icon in the top-right icon bar of the desktop screen of your MacBook Air as shown in the picture below attached.
This is how you can record your screen with an amazing recorder that comes with the WonderShare Filmora application on your MacBook Air.
Conclusion
There may be other tools and screen recorders in the market available for your MacBook Air. But for the sake of carrying important information to all the users out there looking for information regarding screen recorders then we serve our purpose for them. Here in this article, the aim was to provide the simplest application and ways to record your screen with great ease. We started with pretty much basic screen recording shortcuts and basic applications to screen record your Mac. We greatly hope after reading this article it will be never a problem for you to screen record anytime using your MacBook Air.
- Title: [Updated] Streamlined Techniques for Efficient Apple Screenshots
- Author: Emma
- Created at : 2024-07-24 09:18:21
- Updated at : 2024-07-25 09:18:21
- Link: https://on-screen-recording.techidaily.com/updated-streamlined-techniques-for-efficient-apple-screenshots/
- License: This work is licensed under CC BY-NC-SA 4.0.